You can easily create a C1Book control at design time in Expression Blend, in XAML, and in Code. Note that if you create a C1Book control as in the following steps, it will appear as an empty container. You will need to add items to the control for it to appear as a book at run time. For an example, see Adding Items to a Book.
At Design Time in Blend
To create a C1Book control in Blend, complete the following steps:
1. Navigate to the Projects window and right-click the References folder in the project files list. In the context menuchoose Add Reference, locate and select the C1.Silverlight.dll and C1.Silverlight.Extended.dll assemblies, and click Open.
The dialog box will close and the references will be added to your project and the controls will be available in the Asset Library.
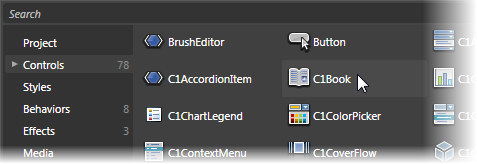
2. In the Toolbox click on the Assets button (the double chevron icon) to open the Assets dialog box.
3. In the Asset Library dialog box, choose the Controls item in the left pane, and then click on the C1Book icon in the right pane:
The C1Book icon will appear in the Toolbox under the Assets button.
4. Click once on the design area of the UserControl to select it. Unlike in Visual Studio, in Blend you can add Silverlight controls directly to the design surface as in the next step.
5. Double-click the C1Book icon in the Toolbox to add the control to the panel. The C1Book control will now exist in your application.
6. If you choose, you can customize the control by selecting it and setting properties in the Properties window. For example, set the C1Book control's Name property to "c1book1".
In XAML
To create a C1Book control using XAML markup, complete the following steps:
1. In the Visual Studio Solution Explorer, right-click the References folder in the project files list. In the context menuchoose Add Reference, select the C1.Silverlight.dll and C1.Silverlight.Extended.dll assemblies, and click OK.
2. Add a XAML namespace to your project by adding xmlns:c1="clr-namespace:C1.Silverlight.Extended;assembly=C1.Silverlight.Extended" to the initial <UserControl> tag. It will appear similar to the following:
<UserControl xmlns="http://schemas.microsoft.com/winfx/2006/xaml/presentation" xmlns:x="http://schemas.microsoft.com/winfx/2006/xaml" xmlns:c1="clr-namespace:C1.Silverlight.Extended;assembly=C1.Silverlight.Extended" x:Class="C1Book.MainPage" Width="640" Height="480">
3. Add a <c1:C1Book> tag to your project within the <Grid> tag to create a C1Book control. The markup will appear similar to the following:
<Grid x:Name="LayoutRoot" Background="White">
<c1:C1Book x:Name="c1book1" Height="300" Width="450"/>
</c1:C1Book>
</Grid>
This markup will create an empty C1Book control named "c1book1" and set the control's size.
In Code
To create a C1Book control in code, complete the following steps:
1. In the Visual Studio Solution Explorer, right-click the References folder in the project files list. In the context menuchoose Add Reference, select the C1.Silverlight.dll and C1.Silverlight.Extended.dll assemblies, and click OK.
2. Right-click within the MainPage.xaml window and select View Code to switch to Code view.
3. Add the following import statements to the top of the page:
Imports C1.Silverlight
Imports C1.Silverlight.Extended
•C#
using C1.Silverlight;
using C1.Silverlight.Extended;
4. Add code to the page's constructor to create the C1Book control. It will look similar to the following:
Public Sub New()
InitializeComponent()
Dim c1book1 as New C1Book
c1book1.Height = 300
c1book1.Width = 450
LayoutRoot.Children.Add(c1book1)
End Sub
•C#
public MainPage()
{
InitializeComponent();
C1Book c1book1 = new C1Book();
c1book1.Height = 300;
c1book1.Width = 450;
LayoutRoot.Children.Add(c1book1);
}
This code will create an empty C1Book control named "c1book1", set the control's size, and add the control to the page.
What You've Accomplished
You've created a C1Book control. Note that when you create a C1Book control as in the above steps, it will appear as an empty container. You will need to add items to the control for it to appear as a book at run time. For an example, see Adding Items to a Book.