ColorPicker for Silverlight includes over 20 predefined color palettes that match the themes used in Microsoft Office. For more information about palette choices, see Available ColorPicker Palettes. To change the color palette, you can set the Palette property.
To set the Palette property, complete the following steps:
1. Click once within the UserControl to select it.
2. Navigate to the ToolBox and double-click the Button control to add it to the project.
3. Resize and reposition the Button on the page.
4. Change the Button's default content by replacing the Content markup with Content="Change Palette" in the button's XAML tag.
5. Give the control a name and add an event handler, by adding Name="btn1" Click="btn1_Click" to the button's XAML tag.
6. Switch to Code view and add code for the Button_Click event handler:
Private Sub btn1_Click(ByVal sender as Object, ByVal e as System.Windows.RoutedEventArgs)
' Set the color palette.
c1cp1.Palette = ColorPalette.GetColorPalette(Office2007ColorTheme.GrayScale)
End Sub
•C#
private void btn1_Click(object sender, System.Windows.RoutedEventArgs e)
{
// Change color palette.
this.c1cp1.Palette = ColorPalette.GetColorPalette(Office2007ColorTheme.GrayScale);
}
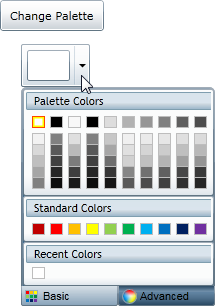
The ColorPicker's color palette will now change to grayscale when the button is clicked.
Run the application and observe:
Observe the following:
1. Click the C1ColorPicker control's drop-down arrow and notice that the default palette appears.
2. Click the Change Palette button and click the C1ColorPicker control's drop-down arrow once again. Notice that a grayscale palette appears: