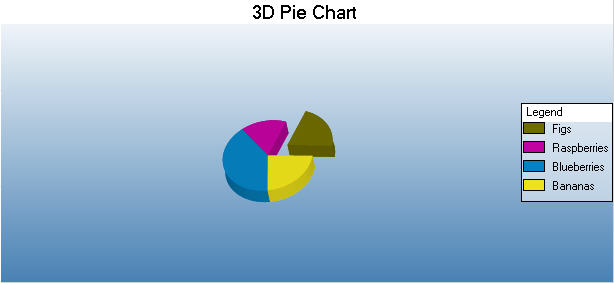
This walkthrough illustrates how to create a three dimensional pie chart.
The walkthrough is split up into the following activities:
- Creating a new Visual Studio project
- Adding an ActiveReport to a Visual Studio project
- Adding a chart control to the report
- Adding a series and data points to the chart
- Setting the chart's properties
- Viewing the report
When you have finished this walkthrough, you will have a chart that looks similar to the following.

Creating a new Visual Studio project
To create a new Visual Studio project
- Open Visual Studio.
-
Click on File > New > Project.
- Select the project type and click on Windows Application.
- Change the name of your project and click OK.
Adding an ActiveReport to a Visual Studio project
To add an ActiveReport to your project
- Open a new project in Visual Studio.
- Click on Project > Add New Item.
- Select ActiveReports file and rename the file rpt3DPieChart.
- Click Open.
Adding a chart control to the report
To add a chart control to the report
- Resize the section in which you want to place the chart.
- Click the Charting icon in the ActiveReports toolbox and draw it onto the report.
Adding a series and data points to the chart
To add a series and data points to the chart
- With the chart control highlighted, click the Series (Collection) property in the Properties Window, then click the ellipsis button that appears to open the Series Collection Editor.
- Click Series1 to select it.
- Under Series Properties, change the ColorPalette property of the new series to Confetti.
- Change the Type property to Doughnut3D.
- Click the Points (Collection) property, then click the ellipsis button that appears.
- Click Add to add a data point, set its LegendText property to Figs, and set its Y value to 19. Expand the Properties and set the ExplodeFactor to .5 to pull this slice out from the pie.
- Click Add to add another data point, set its LegendText property to Raspberries, and set its YValues property to 15.
- Click Add to add another data point, set its LegendText property to Blueberries, and set its YValues property to 37.
- Click Add to add another data point, set its LegendText property to Bananas, and set its YValues property to 21.
- Click OK to return to the Series Collection Editor.
- Remove Series2 and Series3.
- Click OK to return to the report design surface.
Setting the chart's properties
To set the chart's properties
- With the chart control highlighted, click the ChartAreas (Collection) property in the Properties Window, then click the ellipsis button that appears to open the ChartArea Collection Editor.
- Expand the Projection property and change the VerticalRotation property to 50. This allows you to see more of the top of the pie.
- Click OK to return to the report design surface.
- With the chart control highlighted, click the Titles (Collection) property in the Properties Window, then click the ellipsis button that appears to open the Title Collection Editor.
- In the header properties, change the Text property to "3D Pie Chart."
- Expand the Font property and set the Size to 14 to make your title stand out more.
- Remove the footer title.
- Click OK to return to the report design surface.
Viewing the report
To view the report
- Add the ActiveReports viewer control to a Windows Form.
- Add the code needed to set the viewer document equal to the report document. See Using the ActiveReports WinForm Viewer for help.
Copyright © 2004-2005 Data Dynamics, Ltd. All rights reserved.