| ActiveReports for .NET 2 Online Help | Send feedback to Data Dynamics |
Glossary Item Box
ActiveReports allows you to add pages to your report in Visual Studio for previewing in the viewer control or printing. The document containing the inserted pages can also be saved to an RDF file or exported.
This walkthrough illustrates how to create two reports and insert the second report as a cover page for the first one.
This walkthrough is split up into the following activities:
To complete the walkthrough, you must have access to the NorthWind database (NWind.mdb).
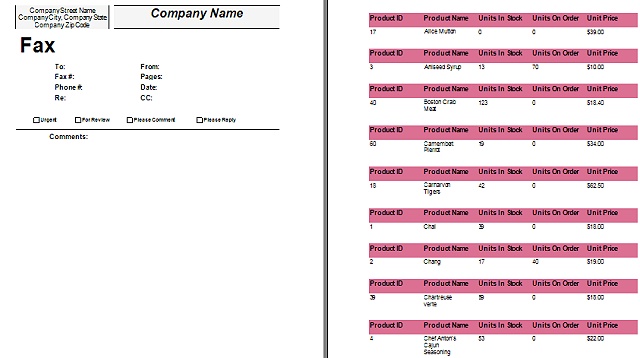
When you have completed this walkthrough, you will have a report that looks similar to the following.

To add two ActiveReports to a Visual Studio project
To connect rptInsertPage to a data source
To add controls to the reports
| Control | Name | Text/Caption | Location |
|---|---|---|---|
| Label | lblProductID | Product ID | 0, 0 |
| Label | lblProductName | Product Name | 1.312, 0 |
| Label | lblUnitsInStock | Units In Stock | 2.625, 0 |
| Label | lblUnitsOnOrder | Units On Order | 3.937, 0 |
| Label | lblUnitPrice | Unit Price | 5.25, 0 |
| Control | DataField | Name | Text/Caption | Misc Details | Location |
|---|---|---|---|---|---|
| TextBox | ProductID | txtProductID | Product ID | (Empty string) | 0, 0 |
| TextBox | ProductName | txtProductName | Product Name | (Empty string) | 1.312, 0 |
| TextBox | UnitsInStock | txtUnitsInStock | Units In Stock | (Empty string) | 2.635, 0 |
| TextBox | UnitPrice | txtUnitPrice | Unit Price | OutputFormat = Currency | 5.25, 0 |
| TextBox | UnitsOnOrder | txtUnitsOnOrder | Units On Order | (Empty string) | 3.937, 0 |
| Control | Name | Text/Caption | Section | Misc Details | Location |
|---|---|---|---|---|---|
| Label | lblCompanyInfo | Company Street Name Company City, Company State Company Zip Code | PageHeader | Text-Align = Center | 0.0625, 0.0625 |
| Label | lblCompanyName | Company Name | PageHeader | Text-Align = Center | 2.437, 0.0625 |
| Line | Line1 | (Empty string) | PageHeader | (Empty string) | X1 = 2.437
Y1 = 0.0625 X2 = 6.437 Y2 = 0.0625 |
| Line | Line2 | (Empty string) | PageHeader | (Empty string) | X1 = 2.437
Y1 = 0.625 X2 = 6.437 Y2 = 0.625 |
| Line | Line3 | (Empty string) | PageHeader | (Empty string) | X1 = 0.0625
Y1 = 0.0625 X2 = 0.0625 Y2 = 0.625 |
| Line | Line4 | (Empty string) | PageHeader | (Empty string) | X1 = 2.312
Y1 = 0.0625 X2 = 2.312 Y2 = 0.625 |
| TextBox | txtComments | Comments: | Detail | (Empty string) | 0.875, 2.437 |
| Control | Name | Text/Caption | Misc Details | Location |
|---|---|---|---|---|
| Label | lblFax | Fax | Text-Align = Center | 0.0625, 0.0625 |
| Label | lblTo | To: | (Empty string) | 1, 0.75 |
| Label | lblFax2 | Fax #: | (Empty string) | 1, 1 |
| Label | lblPhone | Phone #: | (Empty string) | 1, 1.25 |
| Label | lblRe | Re: | (Empty string) | 1, 1.5 |
| TextBox | txtTo | (Empty string) | (Empty string) | 1.875, 0.75 |
| TextBox | txtFax | (Empty string) | (Empty string) | 1.875, 1 |
| TextBox | txtPhone | (Empty string) | (Empty string) | 1.875, 1.25 |
| TextBox | txtRe | (Empty string) | (Empty string) | 1.875, 1.5 |
| Label | lblCC | CC: | (Empty string) | 3.0625, 1.5 |
| Label | lblDate | Date: | (Empty string) | 3.0625, 1.25 |
| Label | lblPages | Pages: | (Empty string) | 3.0625, 1 |
| Label | lblFrom | From | (Empty string) | 3.0625, 0.75 |
| TextBox | txtFrom | (Empty string) | (Empty string) | 3.937, 0.75 |
| TextBox | txtPages | (Empty string) | (Empty string) | 3.937, 1 |
| TextBox | txtDate | (Empty string) | (Empty string) | 3.937, 1.25 |
| TextBox | txtCC | (Empty string) | (Empty string) | 3.937, 1.5 |
| CheckBox | chkUrgent | Urgent | (Empty string) | 0.5, 2.0625 |
| CheckBox | chkForReview | For Review | (Empty string) | 1.5, 2.0625 |
| CheckBox | chkPleaseComment | Please Comment | (Empty string) | 2.75, 2.0625 |
| CheckBox | chkPleaseReply | Please Reply | (Empty string) | 4.437, 2.0625 |
| Line | Line5 | (Empty string) | (Empty string) | X1 = 0.0625
Y1 = 2.375 X2 = 6.437 Y2 = 2.375 |
| TextBox | txtComments | Comments: | (Empty string) | 0.875, 2.437 |
To write the code in Visual Basic
To write the code in C#
The following example shows what the code for the Insert method looks like.
' Visual Basic
Private Sub Form1_Load(ByVal sender As System.Object, ByVal e As System.EventArgs) _
	Handles MyBase.Load
	Dim rpt As New rptInsertPage()
	Viewer1.Document = rpt.Document
	rpt.Run()
	Dim rpt2 As New rptCoverPage()
	rpt2.Run()
	rpt.Document.Pages.Insert(0, rpt2.Document.Pages(0))
End Sub
//C#
private void Form1_Load(object sender, System.EventArgs e)
{
	rptInsertPage rpt = new rptInsertPage();
	rptCoverPage rpt2 = new rptCoverPage();
	viewer1.Document = rpt.Document;
	rpt.Run();
	rpt2.Run();
	rpt.Document.Pages.Insert(0, rpt2.Document.Pages[0]);
}
The following example shows what the code for the InsertNew method looks like. This method allows you to insert a new page at the location you specify.
' Visual Basic
Private Sub Form1_Load(ByVal sender As System.Object, ByVal e As System.EventArgs) _
	Handles MyBase.Load
	Dim rpt As New rptInsertPage()
	Viewer1.Document = rpt.Document
	rpt.Run()
	rpt.Document.Pages.InsertNew(3)
End Sub
//C#
private void Form1_Load(object sender, System.EventArgs e)
{
	rptInsertPage rpt = new rptInsertPage();
	viewer1.Document = rpt.Document;
	rpt.Run();
	rpt.Document.Pages.InsertNew(3);
}
To view the report
| See Also |
Samples | Walkthroughs | OutputFormat Strings | GroupKeepTogether enumeration
Copyright © 2004-2005 Data Dynamics, Ltd. All rights reserved.