| ActiveReports for .NET 2 Online Help | Send feedback to Data Dynamics |
Glossary Item Box
| ActiveReports for .NET 2 Online Help | Send feedback to Data Dynamics |
This walkthrough illustrates how to set up the ActiveReports Toolbox to add to the basic layout of your end-user report designer. This walkthrough builds on the walkthrough "Creating the Basic Layout for an end-user report designer."
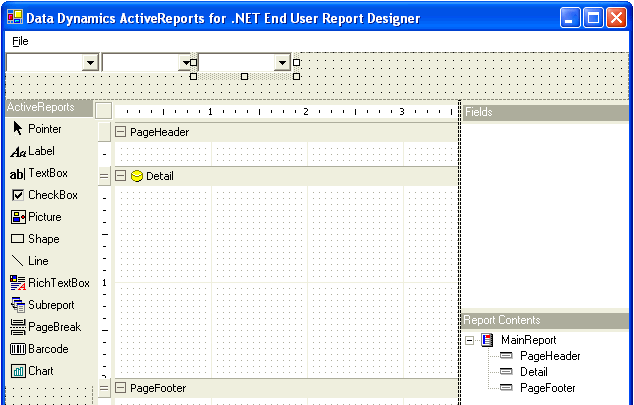
This walkthrough is split up into the following activities:When you have completed this walkthrough, your layout for end-user report designer will look similar to the following.
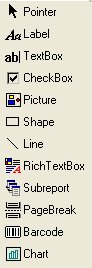
To add buttons to the Toolbox collection
To add an ImageList
To add the icon images
To set properties for the buttons
| Button # | Tag | Name | Text | ToolTipText |
|---|---|---|---|---|
| toolBarButton1 | Pointer | tbbPointer | Pointer | Pointer |
| toolBarButton2 | Label | tbbLabel | Label | Label |
| toolBarButton3 | TextBox | tbbTextBox | TextBox | TextBox |
| toolBarButton4 | CheckBox | tbbCheckBox | CheckBox | CheckBox |
| toolBarButton5 | Picture | tbbPicture | Picture | Picture |
| toolBarButton6 | Shape | tbbShape | Shape | Shape |
| toolBarButton7 | Line | tbbLine | Line | Line |
| toolBarButton8 | RichText | tbbRichTextBox | RichTextBox | RichTextBox |
| toolBarButton9 | Subreport | tbbSubreport | Subreport | Subreport |
| toolBarButton10 | PageBreak | tbbPageBreak | PageBreak | PageBreak |
| toolBarButton11 | Barcode | tbbBarcode | Barcode | Barcode |
| toolBarButton12 | Chart | tbbChart | Chart | Chart |
| See Also |
Walkthrough: Adding Code for the ActiveReports Toolbox | Samples | Walkthroughs
Copyright © 2004-2005 Data Dynamics, Ltd. All rights reserved.