Walkthrough: Creating the Basic Layout for an End-User Report Designer
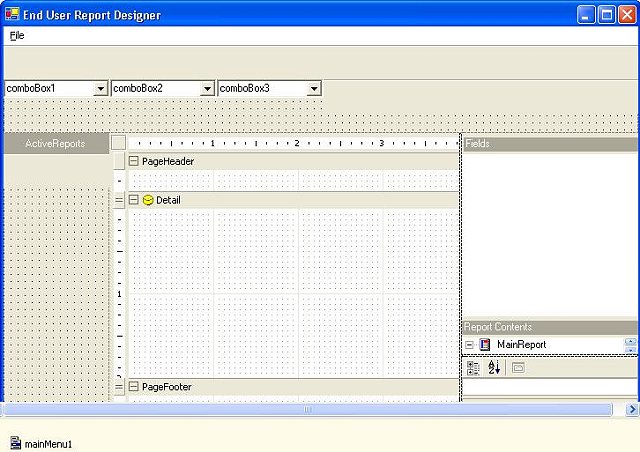
This walkthrough illustrates how to set up a basic layout of an end-user report designer on a Windows Form.
This walkthrough is split up into the following activities:
- Adding a Windows Form to a Visual Studio project
- Adding panels and splitters to the form
- Adding the ActiveReports end-user report designer control to the form
- Adding the Report Explorer to the form
- Adding the Property Grid to the form
- Adding a label to the form
- Adding toolbars and combo boxes to the form
- Adding a Main Menu control to the form
When you have completed this walkthrough, you will have a basic layout which looks similar to the following.

Adding a Windows Form to a Visual Studio project
To add a Windows Form to a Visual Studio project
- Open a Visual Studio project.
- Click on Project > Add Windows Form...
- Name the form frmDesigner and click Open.
- Resize frmDesigner to the desired height and width.
- Change the text for frmDesigner to "End-User Report Designer."
Adding panels and splitters to the form
To add panels and splitters to the form
- Add a panel to the form and set the Dock property to Top.
- Add a second panel to the form and set the Dock property to Left.
- Add a third panel to the form and set the Dock property to Right.
- Add a splitter to the form and set the Dock property to Right.
- In the right panel, add a panel and set the Dock property to Bottom.
- Add a splitter to the right panel and set the Dock property to Bottom.
- Add a panel to the right panel and set the Dock property to Fill.
Adding the ActiveReports end-user report designer control to the form
To add the control
- Click at the top of frmDesigner to select the form.
- Click on the ActiveReports Designer control from the toolbox and drag it onto the form.
- Set the Dock property to Fill.
Adding the Report Explorer to the form
To add the Report Explorer
- Click on the top right panel to select it.
- Click on the ActiveReports ReportExplorer control from the toolbox and drag it onto the panel.
- Set the Dock property to Fill.
- Set the ReportDesigner property to designer1.
Adding the Property Grid to the form
To add the Property Grid
- Right-click on the toolbox where you wish to add the Property Grid control.
- Click on Customize Toolbox...
- Select the .NET Framework Components tab.
- Select PropertyGrid from the list and click OK.
- Click on the bottom right panel to select it.
- Click on the Property Grid icon and drag it onto the panel.
- Set the Dock property to Fill.
Adding a label to the form
To add a label
- Add a label to the left panel.
- Set the Dock property to Top.
- Change the BackColor to Control Dark.
- Change the ForeColor to Control Light Light.
- Change the Text to "ActiveReports."
Adding Toolbars and Combo Boxes to the form
To add toolbars and combo boxes
- Click on the top panel to select it and add a toolbar to the panel.
- Change the name of the toolbar to tlbLayout.
- Click on the left panel to select it and add a toolbar to the panel.
- Set the Dock property to Fill.
- Change the name of the toolbar to tlbARToolbox.
- Add three combo boxes to the top panel underneath tlbLayout.
- Set the Dock property to Left for all three combo boxes and change the names to: cmbClassName, cmbFonts and cmbFontSize.
- Add a toolbar to the top panel underneath tlbLayout.
- Set the Dock property to Fill.
- Change the name of the toolbar to tlbReport.
Adding a Main Menu control to the form
To add a Main Menu control
- Click on frmDesigner to select it.
- Click on the MainMenu control and drag it onto the form.
- Set the Menu property for frmDesigner to MainMenu1.
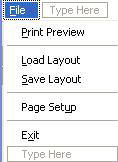
- Add the following items to the menu:
- &File--change the name to mnuFile
- &Print Preview--change the name to mnuPrintPreview
- -
- &Load Layout--change the name to mnuLoadLayout
- &Save Layout--change the name to mnuSaveLayout
- -
- Page Set&up--change the name to mnuPageSetup
- -
- E&xit--change the name to mnuExit

Walkthrough: Adding Code for the End-User Report Designer | Walkthrough: Adding Code for the Main Menu | Walkthrough: Adding Code for the Property Grid | Samples | Walkthroughs
Copyright © 2004-2005 Data Dynamics, Ltd. All rights reserved.