| ActiveReports for .NET 2 Online Help | Send feedback to Data Dynamics |
Glossary Item Box
In ActiveReports for .NET 2.0, data sets with relationships can be used to populate fields in subreports.
Note Subreports will not render PageHeader/Footer sections.
This walkthrough illustrates how to use data sets with relationships in nested subreports.
This walkthrough is split up into the following activities:
To complete the walkthrough, you must have access to the NorthWind database (NWind.mdb).
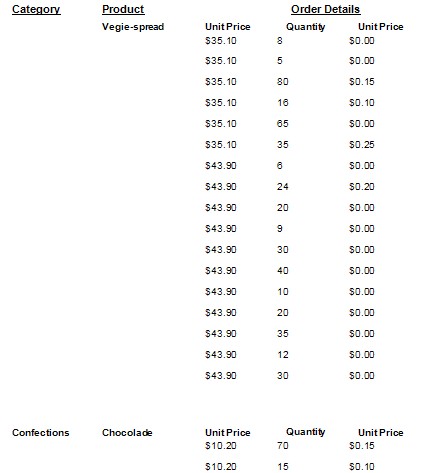
When you have finished this walkthrough, you will have a report that looks similar to the following.

To add three ActiveReports to a Visual Studio project
To add controls to the reports
| Control | DataField | Name | Text/Caption | Section | Location |
|---|---|---|---|---|---|
| Label | (Empty string) | lblCategoryName | Category Name | PageHeader | 0, 0 |
| Label | (Empty string) | lblProduct | Product | PageHeader | 1.25, 0 |
| Label | (Empty string) | lblOrderDetails | Order Details | PageHeader | 2.75, 0 |
| TextBox | CategoryName | txtCategoryName | Category Name | GroupHeader | 0, 0 |
| Subreport | (Empty string) | SubReport1 | (Empty string) | Detail | 1.25, 0 |
| Control | DataField | Name | Text/Caption | Section | Location |
|---|---|---|---|---|---|
| TextBox | ProductName | txtProductName | Product Name | GroupHeader | 0, 0 |
| Label | (Empty string) | lblUnitPrice | Unit Price | Detail | 1.4375, 0 |
| Label | (Empty string) | lblQuantity | Quantity | Detail | 2.5625, 0 |
| Label | (Empty string) | lblPrice | Price | Detail | 3.5625, 0 |
| Subreport | (Empty string) | SubReport1 | (Empty string) | Detail | 1.4375, 0.1875 |
| Control | DataField | Name | Text/Caption | OutputFormat | Location |
|---|---|---|---|---|---|
| TextBox | UnitPrice | txtUnitPrice | Unit Price | Currency | 0, 0 |
| TextBox | Quantity | txtQuantity | Quantity | (Empty string) | 1, 0 |
| TextBox | Discount | txtDiscount | Discount | Currency | 2, 0 |
To set the data connections
To write the code for the viewer in Visual Basic
To write the code for the viewer in C#
The following example shows what the code for the method looks like.
'Visual Basic
Dim myJoinedDS As New DataSet()
Private Sub Form1_Load(ByVal sender As System.Object, ByVal e As System.EventArgs) _
	Handles MyBase.Load
	Dim rpt As New rptCategories()
	Dim cnnString As String
	Dim cnn As New OleDb.OleDbConnection()
	cnnString = "Provider=Microsoft.Jet.OLEDB.4.0;Data Source=c:\NWIND.MDB"
	cnn = New OleDb.OleDbConnection(cnnString)
	cnn.Open()
	Dim catAd As New OleDb.OleDbDataAdapter("Select * from categories order by _
		categoryname", cnn)
	Dim prodAd As New OleDb.OleDbDataAdapter("Select * from products order by _
		productname", cnn)
	Dim ODAd As New OleDb.OleDbDataAdapter("Select * from [order details]", cnn)
	catAd.Fill(myJoinedDS, "Categories")
	prodAd.Fill(myJoinedDS, "Products")
	ODAd.Fill(myJoinedDS, "OrderDetails")
	Me.myJoinedDS.Relations.Add("CategoriesProducts", myJoinedDS.Tables("Categories") _
		.Columns("CategoryID"), myJoinedDS.Tables("Products").Columns("CategoryID"))
	Me.myJoinedDS.Relations.Add("ProductsOrderDetails", myJoinedDS.Tables("Products") _
		.Columns("ProductID"), myJoinedDS.Tables("OrderDetails").Columns("ProductID"))
	rpt.DataSource = (myJoinedDS)
	rpt.DataMember = "Categories"
	rpt.Run()
	Me.Viewer1.Document = rpt.Document
End Sub
//C#
public DataSet myJoinedDS = new DataSet();
private void Form1_Load(object sender, System.EventArgs e)
{
	rptCategories rpt = new rptCategories();
	string cnnString = @"Provider=Microsoft.Jet.OLEDB.4.0;Data Source=c:\NWIND.MDB";
	OleDbConnection cnn=new OleDbConnection(cnnString);
	cnn.Open();
	OleDbDataAdapter catAd  = new OleDbDataAdapter("Select * from categories order
		by categoryname",cnn);
	OleDbDataAdapter prodAd  = new OleDbDataAdapter("Select * from products order by
		productname",cnn);
	OleDbDataAdapter ODAd  = new OleDbDataAdapter("Select * from [order details]",
		cnn);
	catAd.Fill(myJoinedDS, "Categories");
	prodAd.Fill(myJoinedDS, "Products");
	ODAd.Fill(myJoinedDS, "OrderDetails");
	this.myJoinedDS.Relations.Add("CategoriesProducts", myJoinedDS.Tables
		["Categories"].Columns["CategoryID"], myJoinedDS.Tables["Products"].Columns
		["CategoryID"]);
	this.myJoinedDS.Relations.Add("ProductsOrderDetails", myJoinedDS.Tables
		["Products"].Columns["ProductID"], myJoinedDS.Tables["OrderDetails"].Columns
		["ProductID"]);
	rpt.DataSource = (myJoinedDS);
	rpt.DataMember = "Categories";
	rpt.Run();
	this.viewer1.Document = rpt.Document;
}
To write the code in Visual Basic
To write the code in C#
The following example shows what the code for the method looks like.
'Visual Basic
Dim cnt As Integer
Private Sub Detail_Format(ByVal sender As Object, ByVal e As System.EventArgs) _
	Handles Detail.Format
        Dim drCategories As DataRow
        If CType(Me.DataSource, DataSet).Tables("Categories").Rows.Count > cnt Then
        	drCategories = CType(Me.DataSource, DataSet).Tables("Categories") _
        		.Rows(cnt)
        	cnt = cnt + 1
        End If
        Dim rpt As New rptProductsSub()
        rpt.DataSource = drCategories.GetChildRows(CType(Me.DataSource, DataSet) _
        	.Relations("CategoriesProducts"))
        Me.SubReport1.Report = rpt
End Sub
//C#
int cnt;
private void Detail_Format(object sender, System.EventArgs eArgs)
{
	DataRow drCategories = null;
	if(((DataSet)this.DataSource).Tables["Categories"].Rows.Count>cnt)
	{
		drCategories = ((DataSet)this.DataSource).Tables["Categories"]
			.Rows[cnt];
		cnt++;
	}
	rptProductsSub rpt = new rptProductsSub();
	rpt.DataSource = drCategories.GetChildRows(((DataSet)this.DataSource)
		.Relations["CategoriesProducts"]);
	this.SubReport1.Report = rpt;
}To write the code in Visual Basic
To write the code in C#
The following example shows what the code for the method looks like.
'Visual Basic
Dim cnt As Integer
Private Sub Detail_Format(ByVal sender As Object, ByVal e As System.EventArgs) _
	Handles Detail.Format
	Dim rpt As New rptOrderDetailsSub()
	Dim drc() As DataRow
	drc = CType(Me.DataSource, DataRow())
	rpt.DataSource = drc(cnt).GetChildRows("ProductsOrderDetails")
	Me.SubReport1.Report = rpt
	cnt = cnt + 1
End Sub
//C#
int cnt;
private void Detail_Format(object sender, System.EventArgs eArgs)
{
	rptOrderDetailsSub rpt = new rptOrderDetailsSub();
	DataRow[] drc = ((DataRow[])this.DataSource);
	rpt.DataSource = drc[cnt].GetChildRows("ProductsOrderDetails");
	this.SubReport1.Report = rpt;
	cnt++;
}To view the report
| See Also |
Samples | Walkthroughs | Binding Reports to a Data Source | OutputFormat Strings | GroupKeepTogether enumeration
Copyright © 2004-2005 Data Dynamics, Ltd. All rights reserved.