Walkthrough: Hierarchical Subreports
ActiveReports allows reports to contain any number of child reports by using the Subreport control. Child reports, or subreports, are executed each time the parent section (i.e. the section in which the Subreport control is placed) is printed.
Note: Subreports will not render PageHeader/Footer sections, so you can delete them to save on processing time.
This walkthrough illustrates how to set up a bound subreport by setting the Subreport control's Report property to the child report and how to modify the subreport record source from the data in the parent report to retrieve the correct information.
This walkthrough is split up into the following activities:
- Adding two ActiveReports to a Visual Studio project
- Connecting rptCustomers to a data source
- Adding controls to each report to display the data
- Adding the code needed to set the subreport control equal to rptOrders
- Viewing the report
To complete the walkthrough, you must have access to the NorthWind database (NWind.mdb).
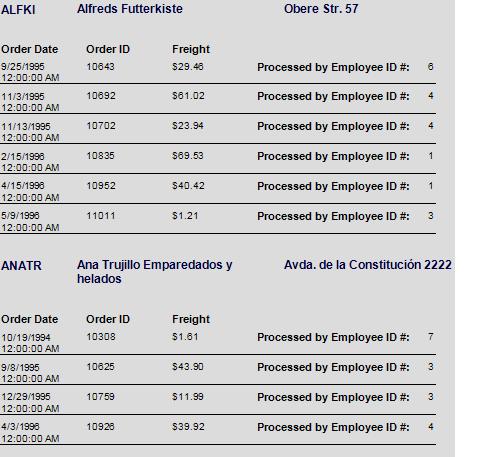
When you have finished this walkthrough, you will have a report that looks similar to the following.

Adding two ActiveReports to a Visual Studio project
To add two ActiveReports to a Visual Studio project
- Open a new project in Visual Studio.
- Click on Project > Add New Item.
- Select ActiveReports file and rename the file rptCustomers.
- Click Open.
- Click on Project > Add New Item.
- Select ActiveReports file and rename the file rptOrders.
- Click Open.
Connecting rptCustomers to a data source
To connect the report to a data source
- Click on the yellow report DataSource icon in the Detail section. This brings up the report DataSource dialog box.
- Click on Build...
- Select Microsoft Jet 4.0 OLE DB Provider and click Next >>
- Click on the ellipsis to browse for the access path to NWind.mdb. Click Open once you have selected the appropriate access path.
- Click OK to continue.
- In the Query field, type "SHAPE {SELECT CustomerID, CompanyName, Address FROM Customers} APPEND ({SELECT CustomerID, OrderID, Freight, OrderDate, EmployeeID FROM Orders} AS CustomerOrders RELATE CustomerID TO CustomerID)".
- Add the following to the beginning of the Connection String: "Provider=MSDataShape;". Your complete Connection String should look similar to: "Provider=MSDataShape;Data Provider=Microsoft.Jet.OLEDB.4.0;Data Source=C:\NWIND.MDB;Persist Security Info=False".
- Click OK to return to the report design surface.
Adding controls to display the data
To add controls to the reports
- Add the following controls to rptCustomers, naming them as indicated:
| Control |
DataField |
Name |
Text/Caption |
Location |
| TextBox |
CustomerID |
txtCustomerID |
Customer ID |
0, 0 |
| TextBox |
CompanyName |
txtCompanyName |
Company Name |
1.0625, 0 |
| TextBox |
Address |
txtAddress |
Address |
3.9375, 0 |
| Subreport |
CustomerOrders |
Subreport1 |
(Empty string) |
0, 0.5 |
- Add a GroupHeader/Footer section to rptOrders
- Make the following changes to the group header:
- Change the name to ghOrders
- Change the DataField property to CustomerID
- Add the following controls to rptOrders, naming them as indicated:
| Control |
DataField |
Name |
Text/Caption |
Section |
Location |
| Label |
(Empty string) |
lblOrderDate |
Order Date |
GroupHeader |
0, 0 |
| Label |
(Empty string) |
lblOrderID |
Order ID |
GroupHeader |
1.1875, 0 |
| Label |
(Empty string) |
lblFreight |
Freight |
GroupHeader |
2.375, 0 |
| TextBox |
OrderDate |
txtOrderDate |
Order Date |
Detail |
0, 0 |
| TextBox |
OrderID |
txtOrderID |
Order ID |
Detail |
1.1875, 0 |
| TextBox |
Freight |
txtFreight |
Freight |
Detail |
2.375, 0 |
| TextBox |
EmployeeID |
txtEmployeeID |
Employee ID |
Detail |
5.9375, 0 |
| Label |
(Empty string) |
lblProcessed |
Processed by Employee ID #: |
Detail |
3.5625, 0 |
| Line |
(Empty string) |
Line1 |
(Empty string) |
Detail |
X1: 0
Y1: 0.25
X2: 6.5
Y2: 0.25 |
Adding the code needed to set the subreport control equal to rptOrders
To write the code in Visual Basic
- Double-click in the grey area below rptCustomers. This creates an event-handling method for rptCustomers' ReportStart event. Add code to the handler to:
- Set the subreport control equal to rptOrders
To write the code in C#
- Click in the grey area below rptCustomers to select the report. Click on the events icon in the Properties window to display available events for the report. Double-click ReportStart. This creates an event-handling method for rptCustomers' ReportStart event. Add code to the handler to:
- Set the subreport control equal to rptOrders
The following example shows what the code for the method looks like.
' Visual Basic
Private Sub rptCustomers_ReportStart(ByVal sender As Object, ByVal e As System.EventArgs) _
	Handles MyBase.ReportStart
        Me.SubReport1.Report = New rptOrders()
End Sub
//C#
private void rptCustomers_ReportStart(object sender, System.EventArgs eArgs)
{
	this.SubReport1.Report = new rptOrders();
}
Viewing the report
To view the report
- Add the ActiveReports viewer control to a Windows Form.
- Add the code needed to set the viewer document equal to the report document. See Using the ActiveReports WinForm Viewer for help.
Samples | Walkthroughs
Copyright © 2004-2005 Data Dynamics, Ltd. All rights reserved.