Localizing the ActiveReports Designer
In ActiveReports, the report designer control and associated dialogs can be localized.
This walkthrough illustrates the basics of setting up localized strings for the ActiveReports report designer control.
The walkthrough is split up into the following activities:
- Creating a new Visual Studio project
- Creating a directory
- Using the Windows Resource Localization Editor for the resource files
- Running the Satellite Assembly Utility to create a satellite assembly
- Adding the ActiveReports Report Designer control to the project
- Adding code to change the culture information for the project (optional step)
- Running the project
To complete the walkthrough, you must have the following files:
- DataSourceForm.resx
- DDColorDropDown.resx
- DDColorPopup.resx
- DDColorWell.resx
- Descriptions.txt
- DesignerTabArea.resx
- FindReplace.resx
- FormatBorderDialog.resx
|
- GoToLine.resx
- GridSettingsSheet.resx
- NewStyleDialog.resx
- OutputFormatDialog.resx
- PageSettingSheet.resx
- PrinterSettingsSheet.resx
- ReportSettingsDlg.resx
- RichEditInsertFieldDlg.resx
|
- ScriptEditor.resx
- Strings.txt
- StyleSettingsSheet.resx
- PublicKey.snk
- SatelliteAssembly.exe
- ActiveReports.Design2.dll
|
You can find these files in your Program Files/Data Dynamics/ActiveReports for .NET 2.0/Localization folder (most are in the Designer folder). You can find the current ActiveReports.Design2.dll installed on your machine in the Program Files/Common Files/Data Dynamics/ActiveReports for .NET 2.0 folder.
This walkthrough should be completed in conjunction with the Localizing the ActiveReports Report Engine walkthrough.
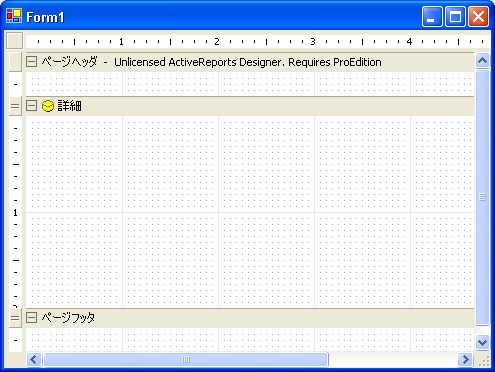
When you have finished this walkthrough, you will have a localized ActiveReports designer that looks similar to the following. For purposes of this screen shot, Japanese was used to localize the designer.

Creating a new Visual Studio project
To create a new Visual Studio project
- Open Visual Studio.
-
Click on File > New > Project.
- Select the project type and click on Windows Application.
- Change the name of your project and click OK.
Creating a Directory
To create a directory
- Open Windows Explorer and browse to the folder in which your project's EXE file will be contained when the report is run. For Visual Basic .NET, this will be the bin folder. For C#, this will be the bin/Debug folder.
- On the File menu, click New > Folder.
- Name the folder according to the CultureInfo that you will use to localize your project. For example, you would use "ja" for Japanese.
Note: Be sure to be consistent with this name. Localization will not work if you name the folder "ja" but create a localization file based on "Japanese (Japan)" rather than "Japanese" because it will be looking for a folder named "ja-ja-JP."
- Copy the required files to this new folder.
- DataSourceForm.resx
- DDColorDropDown.resx
- DDColorPopup.resx
- DDColorWell.resx
- Descriptions.txt
- DesignerTabArea.resx
- FindReplace.resx
- FormatBorderDialog.resx
|
- GoToLine.resx
- GridSettingsSheet.resx
- NewStyleDialog.resx
- OutputFormatDialog.resx
- PageSettingSheet.resx
- PrinterSettingsSheet.resx
- ReportSettingsDlg.resx
- RichEditInsertFieldDlg.resx
|
- ScriptEditor.resx
- Strings.txt
- StyleSettingsSheet.resx
- PublicKey.snk
- SatelliteAssembly.exe
- ActiveReports.Design2.dll
|
Using the Windows Resource Localization Editor
To use the Windows Resource Localization Editor
- Open a Visual Studio .NET 2003 or 2005 command prompt.
- Run the Windows Resource Localization Editor by typing "winres" and hitting Enter. This editor allows you to edit dialog .resx files for a certain locale. The utility is included as part of the .NET framework.
- Click on File > Open on the Localization Editor's menu bar.
- Change the file type to "ResX File(*.resx)".
- Navigate to the directory that you created and copied the required files into, choose the DataSourceForm.resx file, and click Open to open the file in the Editor.
- On the menu bar, click File > Save, select your localization culture from the list, and then press OK.
- Repeat Steps 3-6 for the rest of the .resx files in the directory you created.
- Close the Windows Resource Localization Editor.
- Close the Visual Studio .NET command prompt window.
- In Windows Explorer, browse to the folder containing the required files and rename the .txt files (Strings.txt and Descriptions.txt) according to the culture you have chosen. For example, you would change "Strings.txt" to "Strings.ja.txt" for Japanese.
Note: If any .resx files contain combo box items then the .resx files need to be modified after they are saved.
Running the Satellite Assembly Utility
To run the Satellite Assembly Utility
- Double-click the SatelliteAssembly.exe file to run the utility.
- On the menu bar, select File > New. This creates a project window for the Satellite assembly.
- On the menu bar, select Edit > Properties...
- On the Build tab of the Properties dialog:
- Select the correct localization culture.
- Set the input and output directories to the directory you created that contains the .resx and .txt files.
- Set the output file name to "ActiveReports.Design2.resources.dll".
- Select or type in the proper Framework Version.
- On the Assembly tab of the Properties dialog:
- In the Assembly Attributes section, set the Version number to match the version of the ActiveReports.Design2.dll file located in the directory you created.
- In the Delayed Signing section, set the Strong Name KeyFile to the publickey.snk key file in the directory you created.
- In the Use Template File section, browse to the ActiveReports.Design2.dll file located in the directory you created. Click OK to continue.
- Right-click on the Resource file list view and select Add...
- With the File Type set to "Resx", add the .resx files that have the culture information added to the file names. For example, for Japanese, you would choose "DataSourceForm.ja.resx", "RichEditInsertFieldDlg.ja.resx", etc. Click Open to add the files to the list.
- Right-click on the list view and select Add... again. Change the File Type to "Strings File" and select the two .txt files that you renamed according to the culture you have chosen. Click Open to add the files to the list.
- Select all of the files in the list view, then right-click and select Edit... This brings up the Edit dialog for each file.
- Change the namespace for each culture-localized file according to the list below. Click OK after each change to save the namespace changes.
| Resource file |
Resource file namespace |
| DataSourceForm.ja.resx |
DataDynamics.ActiveReports |
| DDColorDropDown.ja.resx |
DataDynamics.ActiveReports.Design.Dialogs |
| DDColorPopup.ja.resx |
DataDynamics.ActiveReports.Design.Dialogs |
| DDColorWell.ja.resx |
DataDynamics.ActiveReports.Design.Dialogs |
| DesignerTabArea.ja.resx |
DataDynamics.ActiveReports.Design |
| FindReplace.ja.resx |
Compona.Windows.Forms.SyntaxBox.FindReplaceForm |
| FormatBorderDialog.ja.resx |
DataDynamics.ActiveReports.Design.Dialogs |
| GoToLine.ja.resx |
Compona.Windows.Forms.SyntaxBox.GotoLineForm |
| GridSettingsSheet.ja.resx |
DataDynamics.ActiveReports.Design.Dialogs |
| NewStyleDialog.ja.resx |
DataDynamics.ActiveReports.Design.Dialogs |
| OutputFormatDialog.ja.resx |
DataDynamics.ActiveReports.Design.Dialogs |
| PageSettingSheet |
DataDynamics.ActiveReports.Design.Dialogs |
| PrinterSettingsSheet.ja.resx |
DataDynamics.ActiveReports.Design.Dialogs |
| ReportSettingsDlg.ja.resx |
DataDynamics.ActiveReports.Design.Dialogs |
| RichEditInsertFieldDlg.ja.resx |
DataDynamics.ActiveReports.Design |
| ScriptEditor.ja.resx |
DataDynamics.ActiveReports.Design.Dialogs.InternalC |
| StyleSettingsSheet.ja.resx |
DataDynamics.ActiveReports.Design.Dialogs |
| Strings.ja.txt |
DataDynamics.ActiveReports.Design.Res |
| Descriptions.ja.txt |
DataDynamics.ActiveReports.Design.Res |
- Select Save As... from the File menu. Click the Save button. This will create a .loc file for the culture you have chosen which contains all of the project-related information.
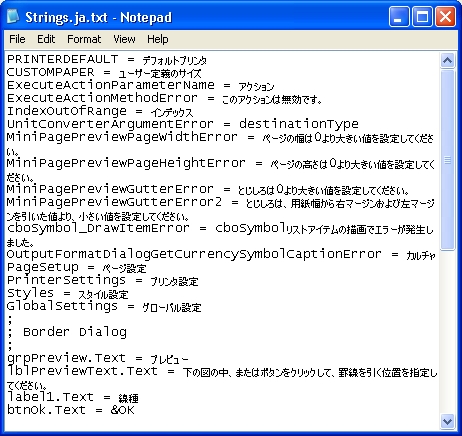
- Double-click on each item in the list view, select Editor..., and edit each file for the language you have chosen to localize. Below is an image of part of the "Strings.ja.txt" file used for this project.

- When all of the resources have been localized, you can build the Satellite assembly (ActiveReports.Design2.resources.dll) by selecting Build Assembly from the Build menu.
Note: If you are unable to edit the .txt files using the Satellite Assembly utility, you can open the files using Notepad and save them with Unicode encoding instead of ANSI.
Adding the ActiveReports Designer control
To add the designer control
- Drag and drop the ActiveReports report Designer control from the appropriate toolbox to Form1.
- Set the Dock property for the Designer to Fill.
Adding code to Change the Culture Information (Optional Step)
Note: This step is only necessary if you are developing on a machine with culture information different from that in the project you are localizing.
To add code to change the culture information
- Add the following code in the form's constructor just before the InitializeComponent method is called. Make sure you replace the "ja" shown in the example code with the appropriate culture information for your project.
' Visual Basic
System.Threading.Thread.CurrentThread.CurrentUICulture = New _
  System.Globalization.CultureInfo("ja")
//C#
System.Threading.Thread.CurrentThread.CurrentUICulture = new
  System.Globalization.CultureInfo("ja");
Running the Project
To run the project
- Press F5 to run the application.
- If the satellite assembly in the directory you created has only been signed with the Data Dynamics public key, you will need to turn off sn security for the assembly. You can do this by going to the Visual Studio .NET 2003 or 2005 command prompt, browsing to the directory in which the file is located and typing in the following line: "sn -Vr ActiveReports.Design2.resources.dll".
Note: Prior to deploying the project, you can send the ActiveReports.Design2.resources.dll file to ActiveReports.Support@DataDynamics.com to have it signed. When you deploy the project, if your other DLLs are being sent to the Global Assembly Cache, this file will also need to be sent there.
Localization
Copyright © 2004-2005 Data Dynamics, Ltd. All rights reserved.