| ActiveReports for .NET 2 Online Help | Send feedback to Data Dynamics |
Glossary Item Box
ActiveReports allows you to merge two or more reports in Visual Studio for previewing in the viewer control or printing. The document containing the merged reports can also be saved to an RDF file or exported.
This walkthrough illustrates how to create two ActiveReports and merge the reports into one document.
This walkthrough is split up into the following activities:
To complete the walkthrough, you must have access to the NorthWind database (NWind.mdb).
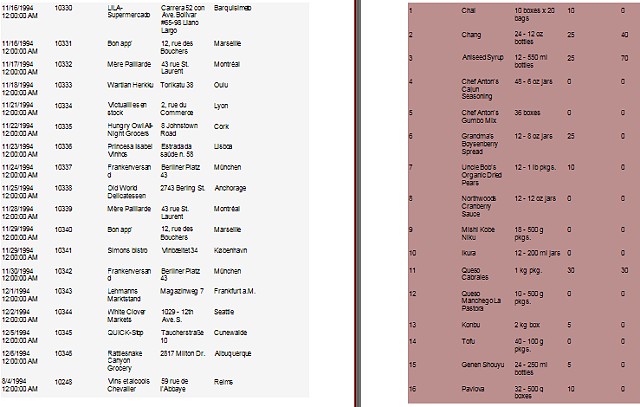
When you have completed this walkthrough, you will have a report that looks similar to the following.

To add two ActiveReports to a Visual Studio project
To connect rptOne to a data source
To connect rptTwo to a data source
To add controls to the reports
| Control | DataField | Name | Text/Caption | Location |
|---|---|---|---|---|
| TextBox | OrderDate | txtOrderDate | Order Date | 0, 0 |
| TextBox | OrderID | txtOrderID | Order ID | 1.125, 0 |
| TextBox | ShipName | txtShipName | Ship Name | 2.25, 0 |
| TextBox | ShipAddress | txtShipAddress | Ship Address | 3.375, 0 |
| TextBox | ShipCity | txtShipCity | Ship City | 4.5, 0 |
| Control | DataField | Name | Text/Caption | Location |
|---|---|---|---|---|
| TextBox | ProductID | txtProductID | Product ID | 0, 0.06 |
| TextBox | ProductName | txtProductName | Product Name | 1.125, 0.06 |
| TextBox | QuantityPerUnit | txtQuantityPerUnit | Quantity Per Unit | 2.25, 0.06 |
| TextBox | ReorderLevel | txtReorderLevel | Reorder Level | 3.375, 0.06 |
| TextBox | UnitsOnOrder | txtUnitsOnOrder | Units On Order | 4.5, 0.06 |
To write the code in Visual Basic
To write the code in C#
The following example shows what the code for the AddRange method looks like.
' Visual Basic
Private Sub Form1_Load(ByVal sender As System.Object, ByVal e As System.EventArgs) _
	Handles MyBase.Load
        Dim rpt As New rptOne()
        rpt.Run()
        Dim rpt2 As New rptTwo()
        rpt2.Run()
        rpt.Document.Pages.AddRange(rpt2.Document.Pages)
        Viewer1.Document = rpt.Document
End Sub
//C#
private void Form1_Load(object sender, System.EventArgs e)
{
	rptOne rpt1 = new rptOne();
	rpt1.Run();
	rptTwo rpt2 = new rptTwo();
	rpt2.Run();
	rpt1.Document.Pages.AddRange(rpt2.Document.Pages);
	viewer1.Document = rpt1.Document;
}
The following example shows what the code for the Add method looks like.
' Visual Basic
Dim i As Integer
Private Sub Form1_Load(ByVal sender As System.Object, ByVal e As System.EventArgs) _
	Handles MyBase.Load
	Dim rpt As New rptOne()
	rpt.Run()
	Dim rpt2 As New rptTwo()
	rpt2.Run()
	For i = 0 To rpt2.Document.Pages.Count - 1
		rpt.Document.Pages.Add(rpt2.Document.Pages(i))
	Next
	Viewer1.Document = rpt.Document
End Sub
//C#
int i;
private void Form1_Load(object sender, System.EventArgs e)
{
	rptOne rpt1 = new rptOne();
	rpt1.Run();
	rptTwo rpt2 = new rptTwo();
	rpt2.Run();
	for(i = 0; i < rpt2.Document.Pages.Count; i++)
	{
		rpt1.Document.Pages.Add(rpt2.Document.Pages[i]);
	}
	viewer1.Document = rpt1.Document;
}
To view the report
| See Also |
Walkthrough: Exporting Output | Samples | Walkthroughs
Copyright © 2004-2005 Data Dynamics, Ltd. All rights reserved.