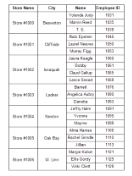
In the Matrix data region, cells with same values are merged automatically to delete duplicate values. The following image illustrates the result of merged cells in a Matrix where similar data exists.
To allow cell merging in Matrix
The following steps use the EmployeeInfo table from the Reels database. By default, in ActiveReports Developer, the Reels.mdb file is located at [User Documents folder]\ComponentOne Samples\ActiveReports Developer 7\Data\Reels.mdb.
- From the Visual Studio toolbox, add the Matrix data region onto the report design surface.
- In the bottom left cell, set a field like StoreName (Fields!StoreName.Value). This automatically creates a row grouping on StoreName.
- Right-click the Matrix to select Properties, and in the Properties Window that appears, at the bottom select Property dialog.
- In the Matrix dialog that appears, go the Row Groups page and click the Add (+) button at the top of the group list to add another group.
- In the expression field of this group, set an expression like Fields!City.Value. This creates an additional row grouping on City.
- Repeat step 4 and 5 above to add two more row groups on Name (Fields!Name.Value) and EmployeeID (Fields!.EmployeeID.Value).

Note: Make sure that the Value property of each TextBox representing the row group in the Matrix is set to the corresponding field value. - Click OK to close the dialog.
- From the Visual Studio toolbox, place a Container control inside the merged cell of the first row in the Matrix data region to create headers for respective columns.

Note: Use textbox controls inside the Container control to create a label for each column. - Go to the preview tab to view the result.
Cell with merged data automatically expands to accommodate large strings.
In case the data flows to the next page at a point where the merged cell is located, the merged cell value repeats on the new page along with the corresponding values of the matrix.
| Page 1 | Page 2 |
|---|---|
Concepts
Matrix


