In this topic you'll add a data source to a project created in Visual Studio 2008. You'll then open the project in Expression Blend to complete binding the grid to the data source. Begin by creating a new WPF project in Visual Studio and adding the C1DataGrid component to your form.
To add a data source and set up data binding in Visual Studio, complete the following steps:
1. From the Data menu, select Add New Data Source. The Data Source Configuration Wizard appears.
2. Confirm that Database is selected and click Next.

3. Click the New Connection button to locate and connect to a database.

If the Choose Data Source dialog box appears, select Microsoft Access Database File and click Continue. The Add Connection dialog box will appear.
4. In the Add Connection dialog box, click the Browse button and locate C1NWind.mdb in the samples installation directory. Select it and click Open.
5. Click the Test Connection button to make sure that you have successfully connected to the database or server and click OK.

6. Click OK to close the Add Connection dialog box. The new string appears in the data connection drop-down list on the Choose Your Data Connection page.
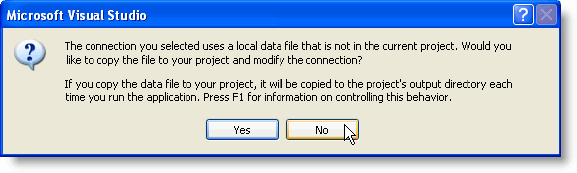
7. Click the Next button to continue. A dialog box will appear asking if you would like to add the data file to your project and modify the connection string. Since it is not necessary to copy the database to your project, click No.
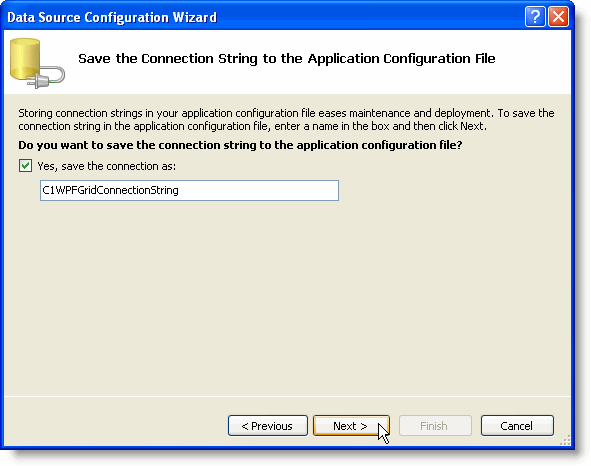
8. In the next window, the Yes, save the connection as checkbox is checked by default and a name has been automatically entered in the text box. Click Next to continue.
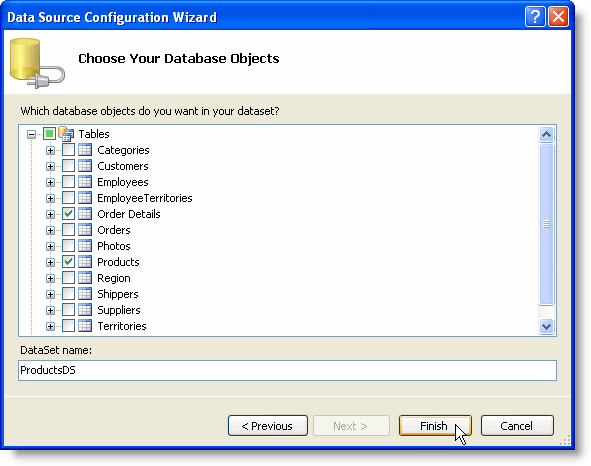
9. In the Choose Your Database Objects window, you can select the tables and fields that you would like in your dataset. Select the Products and Order Details tables and change the DataSet name to ProductsDS.
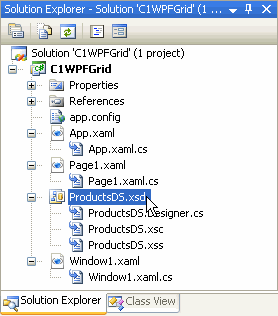
10. Click Finish to exit the wizard. The ProductsDS.xsd files now appear in the Solution Explorer.
11. In the Solution Explorer, double-click the Window1.xaml.cs (or Window1.xaml.vb) file to switch to code view.
12. Add the following references to the top of the Window1.xaml.cs (or Window1.xaml.vb) file, replacing ProjectName with the name of your project:
Imports C1.WPF.C1DataGrid
Imports ProjectName.ProductsDSTableAdapters
• C#
using C1.WPF.C1DataGrid;
using ProjectName.ProductsDSTableAdapters;
13. Add the following code to the Window1 class to retrieve the products and order details data from the database:
Public Partial Class Window1
Inherits Window
Private _productsDataSet As ProductsDS = Nothing
Public ReadOnly Property ProductsDataSet() As ProductsDS
Get
If _productsDataSet Is Nothing Then
_productsDataSet = New ProductsDS()
Dim prodTA As New ProductsTableAdapter()
prodTA.Fill(_productsDataSet.Products)
Dim ordDetTA As New Order_DetailsTableAdapter()
ordDetTA.Fill(_productsDataSet.Order_Details)
End If
Return _productsDataSet
End Get
End Property
Public Sub New()
InitializeComponent()
End Sub
End Class
• C#
public partial class Window1 : Window
{
private ProductsDS _productsDataSet = null;
public ProductsDS ProductsDataSet
{
get
{
if (_productsDataSet == null)
{
_productsDataSet = new ProductsDS();
ProductsTableAdapter prodTA = new ProductsTableAdapter();
prodTA.Fill(_productsDataSet.Products);
Order_DetailsTableAdapter ordDetTA = new Order_DetailsTableAdapter();
ordDetTA.Fill(_productsDataSet.Order_Details);
}
return _productsDataSet;
}
}
public Window1()
{
InitializeComponent();
}
}
14. Run your project to ensure that everything is working correctly and then close your running application and save and close your project. You'll complete binding the grid to a data source in Expression Blend.
To bind the grid to a data source in Expression Blend, complete the following steps:
1. Open Expression Blend and select Open Project/Solution from the File menu.
2. In the Open Project dialog box, locate your project file and click Open. The project you created in Visual Studio will open in Blend.
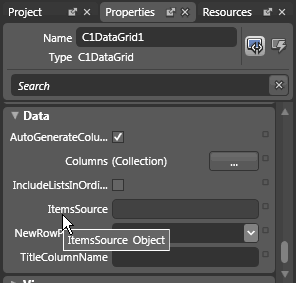
3. Click once on the C1DataGrid control so that it is selected, navigate to the c1DataGrid1 Properties window, and locate the ItemsSource property.
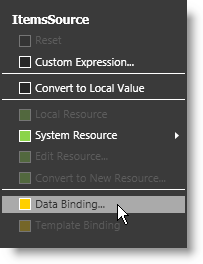
4. Click the square next to the ItemsSource property to access advanced properties and select Data Binding from the menu that appears.
5. In the Create Data Binding dialog box, select the Element Property tab.

The Element Property tab appears with Scene elements in the left pane and Properties in the right pane.
6. In the right Properties pane of the Element Property tab, scroll down and click the arrow icon next to the ProductsDataSet (Array) : (ProductsDS) item to expand the available tables.
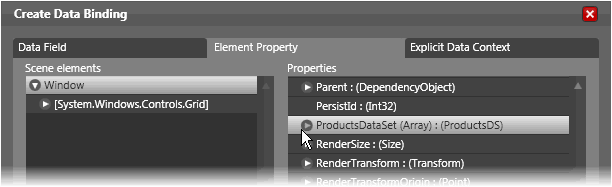
Note that this is the dataset that you added in Visual Studio.
7. Select Products(Array) : (ProductsDataTable) to bind the grid to the products table.
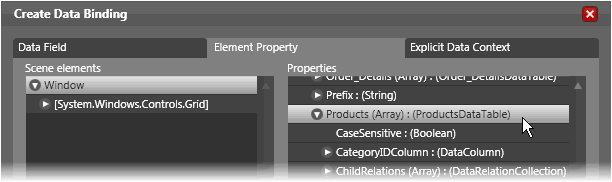
8. Click Finish to complete the data binding process and close the Create Data Binding dialog box.
Notice in the XAML view, the <c1grid:C1DataGrid> now appears as the following:
<c1grid:C1DataGrid Name="c1DataGrid1" ItemsSource="{Binding Path=ProductsDataSet.Products, ElementName=Window, Mode=Default}" />
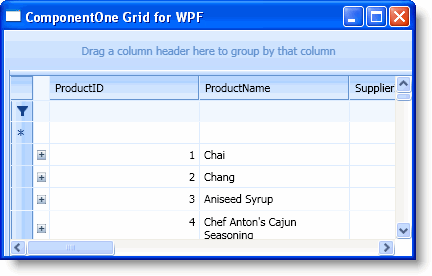
Run the program and observe:
The grid is now populated with data from the Products table.
|
