


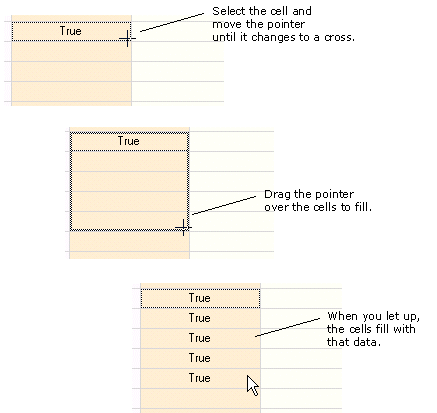
You can also allow them to drag-and-fill data from one cell or a range of cells to another cell or range of cells. With a cell or range of cells selected, you can fill other cells either in a row (or rows if more than one column is selected) or a column (or columns if more than one row is selected).
The example shown here fills several cells in a column from the originally selected cell.
You can customize the direction of the fill using the FillDirection enumeration.
For more information, refer to the AllowDragFill property in the FpSpread class. For more information on event arguments, refer to DragFillBlock event, DragFillBlockEventArgs, and DragFillBlockCompletedEventArgs.
Return to Using Drag Operations to Fill Cells.
Using the Properties Window
- At design time, in the Properties window, select the Spread component.
- Select (in the Behavior category) the AllowDragFill property.
- Select True from the drop-down list to allow drag-and-fill feature, or select False to prohibit it.
Using a Shortcut
Allow the drag-and-fill feature by setting the AllowDragFill property in the FpSpread component.
Example
This example code sets the component to allow the drag-fill feature.
| C# |  Copy Code Copy Code |
|---|---|
fpSpread1.AllowDragFill = true;
|
|
| VB | Copy Code |
|---|---|
FpSpread1.AllowDragFill = True
|
|
Using Code
Allow the drag-and-drop feature by setting the AllowDragFill property in the FpSpread component.
Example
This example code sets the child sheet to allow the drag-fill feature.
| C# | Copy Code |
|---|---|
FarPoint.Win.Spread.SpreadView sv = fpSpread1.GetRootWorkbook();sv.AllowDragFill = true;
|
|
| VB | Copy Code |
|---|---|
Dim sv As FarPoint.Win.Spread.SpreadView = FpSpread1.GetRootWorkbooksv.AllowDragFill = True |
|
Using the Spread Designer
- From the Settings menu, select General (Spread Settings section).
- In the General tab, select the settings for the drag and fill properties as needed.
- Click OK.
- From the File menu choose Apply and Exit to apply your changes to the component and exit Spread Designer.
or
- Select the Spread component (or select Spread from the pull-down menu).
- In the property list for the component (in the Behavior category), select the AllowDragFill property.
- Click the drop-down arrow to display the choices and select True.
- From the File menu choose Apply and Exit to apply your changes to the component and exit Spread Designer.