Each sheet can have its own drawing layer. For instance, in a spreadsheet you could create a shape like a "star" or other graphic that could highlight data or point the user to some aspect of working with the sheet. You could then proceed to customize aspects of that star or graphic from size and background color to rotation angle or gradient. The shapes are available in code (each shape being a separate class in the DrawingSpace namespace) or from the Insert and Drawing Tools menus in the Spread Designer. You can use shapes to draw attention to parts of your spreadsheet or emphasize some information or process involving the use of the spreadsheet. For example, you can display a logo on your sheet, show a process with flowchart-like graphics, or use shapes to simply highlight a particular result. There are several built-in shapes for you to use on a sheet. Each shape can be rotated and resized, and their ability to be rotated and resized by the end user can be constrained. When selected, the shape has resize handles with which you can adjust the size and a rotate handle with which you can rotate the shape. Colors, shadows, and transparency can be adjusted. Most users find it easy to create and place the shapes using Spread Designer. You may also create and place shapes using code.
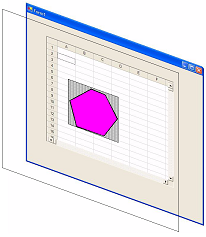
Shapes are a form of graphics that are drawn on a separate layer from that of the spreadsheet. This drawing layer, or drawing space, is in front of the spreadsheet in the display. Shapes can be made all or partially transparent to reveal the spreadsheet behind. An example of a multiple-sided shape drawn in the space above a spreadsheet is shown in this figure to help you understand the concept of layers. Because the shapes appear on this separate layer from the sheet and can be thought to float above the spreadsheet, they are sometimes called floating objects.

These topics can help you use shapes:
- Understanding the Built-in Shapes
- Customizing Particular Shapes
- Things To Do with Any Shape
- Advanced Topics for Shapes
For information on designing a shape, refer to the Insert Menu.
For information on shape keyboard navigation, refer to Default Keyboard Navigation in the Developer’s Guide.
For information on creating camera shapes, refer to Creating Camera Shapes in the Developer’s Guide.
For information on printing shapes, refer to Printing a Sheet with Shapes.