To add a custom visual style to a Studio for ASP.NET control (see Available Visual Styles a list of available visual styles), you will have to add the .css file and images you used to your Visual Studio Web project. These instructions illustrate the process of adding a custom visual style using the C1MultiPage control as an example.
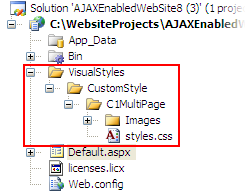
Before you add your .css file and images, you will have to create a hierarchy of folders, the last of which will contain your visual style files. On the top-level of your project, create a folder named "VisualStyles". Underneath the VisualStyles folder, create a sub-folder bearing the theme name (such as "CustomStyle"), and then, beneath that, create a sub-folder named "C1MultiPage". The image folder and .css file should be placed underneath the C1MultiPage folder. The result will resemble the following image:

This structure of these folders is very important; C1MultiPage will always look for the ~/VisualStyles/[StyleName]/C1MultiPage/styles.css path, as it is the default visual style path for the control.
Once the .css file and images are in place, set the VisualStylePath property to the path of the first folder (~/VisualStyles), set the UseEmbeddedVisualStyles property to False, and then set the VisualStyle property to the custom theme name.
|
