Using the C1GridView Properties dialog box, you can also add and remove columns and determine the types of columns to display. Available column types include:
• C1Band: displays a banding column used to create multilevel column headers.
• C1BoundField: displays a column bound to a field in a data source.
• C1ButtonField: displays a command button for each item.
• C1CheckBoxField: displays a Boolean check box for each item.
• C1CommandField: displays a column containing editing commands for each item.
• C1HyperLinkField: displays each item as a hyperlink.
• C1TemplateField: displays each item in the column following a specified template.
To add columns, complete the following steps:
1. Right-click C1GridView control and select Show Smart Tag from the context menu. Select Property builder from the C1GridView Tasks menu. The C1GridView Properties dialog box appears.
2. Click the Columns tab in the left pane. For more information about the Columns tab, see the Columns tab topic.
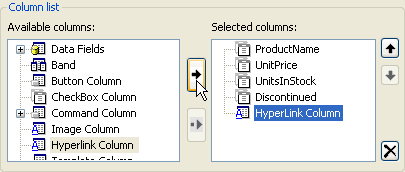
3. Under Column List, select the desired column from the list of Available columns.
4. Click the arrow button between the column lists to create a column under the list of Selected columns. In the image below a HyperLink column was added:
Note: When the check box next to Create columns automatically at run time is checked (default), bound columns are automatically created. If you uncheck the box, you must manually create columns.
|
