) to open the
C1SegmentedButtons Tasks menu and then select SegmentedButtons
Designer.
) to open the
C1SegmentedButtons Tasks menu and then select SegmentedButtons
Designer. In this topic, you will add three buttons to the C1SegmentedButtons control in Design view and in Source view.
In Design View
Complete the following steps:
1. Click the Design tab to enter Design view.
2. In the Toolbox, double-click C1ViewPort to add the control to your page.
3. Add a C1SegmentedButtons control to C1ViewPort's toolbar. (See Adding C1SegmentedButtons to C1ViewPort's Toolbar.)
4.
Click C1SegmentedButton's
smart tag () to open the
C1SegmentedButtons Tasks menu and then select SegmentedButtons
Designer.
The C1SegmentedButtons Designer Form opens.
5. With C1SegmentedButtons01 selected in the treeview, click the Add Child Item button three times to add three buttons to the control.
C1SegmentedButton01, C1SegmentedButton02, and C1SegmentedButton03 are added beneath C1SegmentedButtons1 in the treeview.
6. Right-click C1SegmentedButton01 to open its context menu, click Rename, and then enter "Button1".
7. Repeat the previous step with C1SegmentedButton02 and C1SegmentedButton03, renaming them "Button2" and Button3" respectively.
In Source View
Complete the following steps:
1. Click the Design tab to enter Design view.
2. In the Toolbox, double-click C1ViewPort to add the control to your page.
3. Add a C1SegmentedButtons control to C1ViewPort's toolbar. (See Adding C1SegmentedButtons to C1ViewPort's Toolbar.)
4. Click the Source tab to enter to Source view.
5. Place the following markup between the <cc1:C1SegmentedButtons> and </cc1:C1SegmentedButtons> tags:
<Buttons>
<cc2:C1SegmentedButton ID="C1SegmentedButton1" Text="Button1" runat="server" />
<cc2:C1SegmentedButton ID="C1SegmentedButton2" Text="Button2" runat="server" />
<cc2:C1SegmentedButton ID="C1SegmentedButton3" Text="Button3" runat="server" />
</Buttons>
6. Save the project and open it in a Studio for iPhone-compatible browser.
 This Topic
Illustrates the Following:
This Topic
Illustrates the Following:
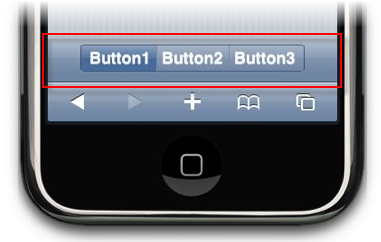
The image below depicts three segmented buttons on the C1ViewPort control's toolbar: