 )
to open the C1PickerView Tasks menu and then select C1PickerView
Designer.
)
to open the C1PickerView Tasks menu and then select C1PickerView
Designer.Each C1Picker has a SelectedIndexChanged event that fires every time the selected index changes. Once that event is fired, you can write a conditional statement to check for the value of the SelectedIndex property. In this topic, you'll add two pickers to the C1PickerView control. The first picker will host a list of categories. When a user selects a category, the second list will populate with items related to that category.
Step 1: Adding the C1Pickers and Creating the First List
Complete the following steps:
1. Click the Design tab to enter Design view.
2. Add a C1PickerView control and a ScriptManager control to your ASP.NET Ajax-Enabled Web project.
3.
Click C1PickerView's smart tag ( )
to open the C1PickerView Tasks menu and then select C1PickerView
Designer.
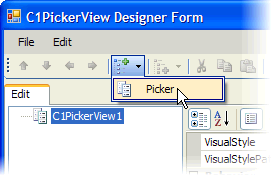
The C1PickerView Designer Form opens.
4. Click the Add Child Item drop-down arrow and select Picker.

5. Repeat step 3 to add a second picker to the control.
6. In treeview, select Picker1 and set its ID property to "Picker01".
7. In treeview, select Picker2 and set its ID property to "Picker02".
8. With Picker1 selected, click the Add Child Item drop-down arrow and select Item.
9.
Click the Add Child Item button  twice to add two more items to the
control.
10. In treeview, right-click Item01 to open its context menu and select Rename. Enter "Books" as the new name.
11. Repeat step 9 with Item02 and Item03, only name them as follows:
•Item02 – "Games"
•Item03 – "Movies"
12. In treeview, select C1PickerView1 and set its AutoPostBackOnSelect property to True. This will cause the control to post back to the server whenever the selected index is changed.
13. Press OK to close the C1PickerView Designer Form.
Step 2: Handling the SelectedIndexChanged Event and Coding the Project
Complete the following steps:
1. Right-click the C1PickerView control and select Properties.
The Properties window opens with C1PickerView's properties in focus.
2.
In the Properties window, click the Events button  to view the control's event list.
3. Double-click the SelectedIndexChanged event to add the event handler to Code view.
4. Add the following code to the C1PickerView1_SelectedIndexChanged event:
If Picker01.SelectedIndex = 0 Then
LoadBookList()
End If
If Picker01.SelectedIndex = 1 Then
LoadGameList()
End If
If Picker01.SelectedIndex = 2 Then
LoadMovieList()
End If
•C#
if (Picker01.SelectedIndex == 0)
{
LoadBookList();
}
if (Picker01.SelectedIndex == 1)
{
LoadGameList();
}
if (Picker01.SelectedIndex == 2)
{
LoadMovieList();
}
5. Enter the following methods after the C1PickerView1_SelectedIndexChanged event. These methods will dynamically create the lists that will be viewed in the second picker when the user selects a category using the first picker.
Private Sub LoadBookList()
Picker02.Items.Clear()
Dim Book1 As New C1PickerItem()
Dim Book2 As New C1PickerItem()
Dim Book3 As New C1PickerItem()
Book1.Text = "Fight Club"
Book2.Text = "Roadside Picnic"
Book3.Text = "Lord of the Rings"
Picker02.Items.Add(Book1)
Picker02.Items.Add(Book2)
Picker02.Items.Add(Book3)
End Sub
Private Sub LoadGameList()
Picker02.Items.Clear()
Dim Game1 As New C1PickerItem()
Dim Game2 As New C1PickerItem()
Dim Game3 As New C1PickerItem()
Game1.Text = "Force Unleashed"
Game2.Text = "Morrowind"
Game3.Text = "The Witcher"
Picker02.Items.Add(Game1)
Picker02.Items.Add(Game2)
Picker02.Items.Add(Game3)
End Sub
Private Sub LoadMovieList()
Picker02.Items.Clear()
Dim Movie1 As New C1PickerItem()
Dim Movie2 As New C1PickerItem()
Dim Movie3 As New C1PickerItem()
Movie1.Text = "Blade Runner"
Movie2.Text = "Braveheart"
Movie3.Text = "Troy"
Picker02.Items.Add(Movie1)
Picker02.Items.Add(Movie2)
Picker02.Items.Add(Movie3)
End Sub
•C#
private void LoadBookList()
{
Picker02.Items.Clear();
C1PickerItem Book1 = new C1PickerItem();
C1PickerItem Book2 = new C1PickerItem();
C1PickerItem Book3 = new C1PickerItem();
Book1.Text = "Fight Club";
Book2.Text = "Roadside Picnic";
Book3.Text = "Lord of the Rings";
Picker02.Items.Add(Book1);
Picker02.Items.Add(Book2);
Picker02.Items.Add(Book3);
}
private void LoadGameList()
{
Picker02.Items.Clear();
C1PickerItem Game1 = new C1PickerItem();
C1PickerItem Game2 = new C1PickerItem();
C1PickerItem Game3 = new C1PickerItem();
Game1.Text = "Force Unleashed";
Game2.Text = "Morrowind";
Game3.Text = "The Witcher";
Picker02.Items.Add(Game1);
Picker02.Items.Add(Game2);
Picker02.Items.Add(Game3);
}
private void LoadMovieList()
{
Picker02.Items.Clear();
C1PickerItem Movie1 = new C1PickerItem();
C1PickerItem Movie2 = new C1PickerItem();
C1PickerItem Movie3 = new C1PickerItem();
Movie1.Text = "Blade Runner";
Movie2.Text = "Braveheart";
Movie3.Text = "Troy";
Picker02.Items.Add(Movie1);
Picker02.Items.Add(Movie2);
Picker02.Items.Add(Movie3);
}
6. Add the following code to the Page_Load event. This will ensure that the second picker is loaded with the first list, Books, at run time.
LoadMovieList()
•C#
LoadMovieList();
Step 3: Running the Project
Complete the following steps:
1. Save the project and open it in a Studio for iPhone-compatible browser.
At run time, the second picker list will be populated with a list of books.
2. Spin the first picker dial to Games and observe that the second picker populates with a list of games.
3. Spin the first picker dial to Movies and observe that the second picker populates with a list of games.
4. Spin the first picker dial back to Books and observe that the list populates with a list of books.
Note that the control posts back to the server each time the index changes.
 Tip: To avoid postbacks to the server between index
changes, you can use the OnClientSelectedIndexChanged event and write a client-side script using
JavaScript (see Handling the Selected Picker
on the Client Side for more information). If you'd still prefer to write
server-side code, you just turn the AutoPostBackOnSelect to False and use a submit button to post back to the
server.