This topic will help you understand how to add an ASP.NET MVC control in your application. You will also learn how to add a model, view and controller in an MVC application. When you use MVC Controls in your web application, it reduces the code complexity, increases flexibility, and helps in reusing the code. For more information about working of MVC controls, see MVC Basics.
Complete the following steps to add an MVC Control.
- Step 1: Add a Model
- Step 2: Add a Controller
- Step 3: Add the Control
- Step 4: Build and Run the Project
 |
Note: Make sure that the required references are included in the project. For more information about references, see Installation. |
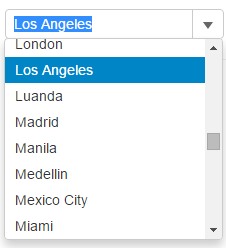
The following image shows how ComboBox control appears after completing the steps above:
Step 1: Add a Model
Models are required to fetch data for the controls. A model is to be added only where it is required. This example uses Cities.cs model, and steps have been given to explain how to add model in your MVC application. For more information about Models, see MVC Basics.
- In the Solution Explorer, right click the folder Models and select Add | Class. The Add New Item dialog appears.
- In the Add New Item dialog, set the name of the class (for example:
Cities.cs), and then click Add. - Add the following code to Cities.cs model. We are using Cities class to represent a list of countries.
C# Copy Codepublic class Cities { public static List<string> GetCities() { return new List<string> { "Abidjan", "Accra", "Ahmedabad", "Alexandria", "Ankara", "Atlanta", "Baghdad", "Bandung", "Bangkok", "Barcelona", "Beijing", "Belo Horizonte", "Bengaluru", "Bogota", "Boston", "Buenos Aires", "Cairo", "Calcutta", "Chengdu", "Chennai", "Chicago", "Chongqung", "Dalian", "Dallas", "Delhi", "Detroit", "Dhaka", "Dongguan", "Essen", "Fuzhou", "Guadalajara", "Guangzhou", "Hangzhou", "Harbin", "Ho Chi Minh City", "Hong Kong", "Houston", "Hyderabad", "Istanbul", "Jakarta", "Johannesburg", "Karachi", "Khartoum", "Kinshasa", "Kuala Lumpur", "Lagos", "Lahore", "Lima", "London", "Los Angeles", "Luanda", "Madrid", "Manila", "Medellin", "Mexico City", "Miami", "Milan", "Monterrey", "Moscow", "Mumbai", "Nagoya", "Nanjing", "Naples", "New York", "Osaka", "Paris", "Pheonix", "Philadelphia", "Porto Alegre", "Pune", "Qingdao", "Quanzhou", "Recife", "Rio de Janeiro", "Riyadh", "Rome", "Saint Petersburg", "Salvador", "San Francisco", "Santiago", "Sao Paulo", "Seoul", "Shanghair", "Shenyang", "Shenzhen", "Singapore", "Surabaya", "Surat", "Suzhou", "Sydney", "Taipei", "Tehran", "Tianjin", "Toronto", "Washington", "Wuhan", "Xi'an-Xianyang", "Yangoon", "Zhengzhou", "Tokyo" }; } }
A new class is added to the application.
- In the Solution Explorer, right click the folder Models and select Add | New Item. The Add New Item dialog appears.
- In the Add New Item dialog, expand the Installed tab towards left and select Code | Class.
- Set the name of the class (for example:
Cities.cs), and then click Add. - Add the following code to Cities.cs model. We are using Cities class to represent a list of countries.
C# Copy Codepublic class Cities { public static List<string> GetCities() { return new List<string> { "Abidjan", "Accra", "Ahmedabad", "Alexandria", "Ankara", "Atlanta", "Baghdad", "Bandung", "Bangkok", "Barcelona", "Beijing", "Belo Horizonte", "Bengaluru", "Bogota", "Boston", "Buenos Aires", "Cairo", "Calcutta", "Chengdu", "Chennai", "Chicago", "Chongqung", "Dalian", "Dallas", "Delhi", "Detroit", "Dhaka", "Dongguan", "Essen", "Fuzhou", "Guadalajara", "Guangzhou", "Hangzhou", "Harbin", "Ho Chi Minh City", "Hong Kong", "Houston", "Hyderabad", "Istanbul", "Jakarta", "Johannesburg", "Karachi", "Khartoum", "Kinshasa", "Kuala Lumpur", "Lagos", "Lahore", "Lima", "London", "Los Angeles", "Luanda", "Madrid", "Manila", "Medellin", "Mexico City", "Miami", "Milan", "Monterrey", "Moscow", "Mumbai", "Nagoya", "Nanjing", "Naples", "New York", "Osaka", "Paris", "Pheonix", "Philadelphia", "Porto Alegre", "Pune", "Qingdao", "Quanzhou", "Recife", "Rio de Janeiro", "Riyadh", "Rome", "Saint Petersburg", "Salvador", "San Francisco", "Santiago", "Sao Paulo", "Seoul", "Shanghair", "Shenyang", "Shenzhen", "Singapore", "Surabaya", "Surat", "Suzhou", "Sydney", "Taipei", "Tehran", "Tianjin", "Toronto", "Washington", "Wuhan", "Xi'an-Xianyang", "Yangoon", "Zhengzhou", "Tokyo" }; } }
A new class is added to the application.
Step 2: Add a Controller
Controllers are simple class files. They are responsible for handling incoming requests to the application, retrieve data, and then specify view templates that return a response to the client.
- In the Solution Explorer, right click the folder Controllers.
- From the context menu, select Add | Controller. The Add Scaffold dialog appears.
- Complete the following steps in the Add Scaffold dialog:
- Select Empty MVC Controller template, and then click Add.
- Set name of the controller (For example:
ComboBoxController). - Click Add.
- Add the following code to replace the Index() method.
C# Copy Code@using <ApplicationName>.Model public ActionResult Index() { ViewBag.Cities = Cities.GetCities(); return View(); }
A new controller is added to the application within the folder Controllers.
- In the Solution Explorer, right click the folder Controllers.
- From the context menu, select Add | New Item. The Add New Item dialog appears.
- Complete the following steps in the Add New Item dialog:
- Expand the Installed tab towards left, and select ASP.NET|MVC Controller Class.
- Set name of the controller (For example:
ComboBoxController). - Click Add.
- Add the following code to replace the Index() method.
C# Copy Code@using <ApplicationName>.Model public ActionResult Index() { ViewBag.Cities = Cities.GetCities(); return View(); }
A new controller is added to the application within the folder Controllers.
Step 3: Add the Control
View helps the user to view a visual representation of the model. View is most commonly associated with model and retrieves the data required with the help of controllers. We will add a code in the Index.cshtml to view ComboBox control in the browser.
- From the Solution Explorer, expand the folder Controllers and double click the controller (for example:
ComboBoxController) to open it. - Place the cursor inside the method
Index(). - Right click and select Add View. The Add View dialog appears.
- In the Add View dialog, verify that the View name is Index and View engine is Razor (CSHTML).
- Click Add.
A view is added for the controller.
- From the Solution Explorer, right click the folder Views and select Add | New Folder.
- Name the new folder. Provide the same name as the name of your controller, minus the suffix Controller (in our example: ComboBox).
- Right click the folder ComboBox, and select Add | New Item. The Add New Item dialog appears.
- Complete the following steps in the Add New Item dialog:
- Expand the Installed tab towards left, and select ASP.NET|MVC View Page.
- Set name of the view (for example: Index.cshtml).
- Click Add.
A view is added for the controller.
- From the Solution Explorer, expand the folder Views.
- Double click
Index.cshtmlto open it. - Replace the default code of the
Index.cshtmlfile with the code given below to initialize ComboBox control.
Razor Copy Code@{List<string> cities = ViewBag.Cities;} <div> @(Html.C1().ComboBox().Bind(cities).SelectedIndex(0)) </div>
- From the Solution Explorer, expand the folder Views.
- Double click Index.cshtml to open it.
- Replace the default code of the Index.cshtml file with the code given below to initialize ComboBox control.
Razor Copy Code@{List<string> cities = ViewBag.Cities;} <div> <c1-combo-box selected-index=0> <c1-items-source source-collection=@cities></c1-items-source> </c1-combo-box> </div>
Step 4: Build and Run the Project
- Click Build | Build Solution to build the project.
- Press F5 to run the project.
|
Append the folder name and view name to the generated URL (for example: http://localhost:1234/ComboBox/index) in the address bar of the browser to see the view. |