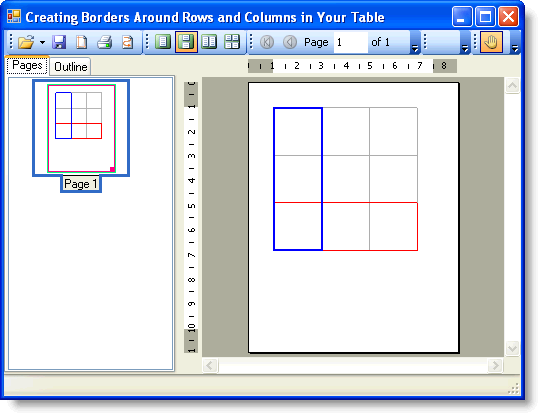
This topic demonstrates how to create distinct borders around a row and a column by using the LineDef class. This topic assumes you already have a table with three columns and three rows.
1. The following code should already exist in your source file:
Private Sub Form1_Load(ByVal sender As System.Object, ByVal e As System.EventArgs) Handles MyBase.Load
' Make a table.
Dim table As C1.C1Preview.RenderTable = New C1.C1Preview.RenderTable(Me.C1PrintDocument1)
table.Style.GridLines.All = New C1.C1Preview.LineDef(Color.DarkGray)
Dim r As Integer = 3
Dim c As Integer = 3
Dim row As Integer
Dim col As Integer
For row = 0 To r - 1 Step +1
For col = 0 To c - 1 Step +1
Dim celltext As C1.C1Preview.RenderText = New C1.C1Preview.RenderText(Me.C1PrintDocument1)
' Add empty cells.
celltext.Text = String.Format("", row, col)
table.Cells(row, col).RenderObject = celltext
Next
Next
' Generate the document.
Me.C1PrintDocument1.Body.Children.Add(table)
Me.C1PrintDocument1.Generate()
End Sub
• C#
private void Form1_Load(object sender, System.EventArgs e)
{
// Make a table.
C1.C1Preview.RenderTable table = new C1.C1Preview.RenderTable(this.c1PrintDocument1);
table.Style.GridLines.All = new C1.C1Preview.LineDef(Color.DarkGray);
const int r = 3;
const int c = 3;
for (int row = 0; row < r; ++row)
{
for (int col = 0; col < c; ++col)
{
C1.C1Preview.RenderText celltext = new C1.C1Preview.RenderText(this.c1PrintDocument1);
celltext.Text = string.Format("", row, col);
// Add empty cells.
table.Cells[row, col].RenderObject = celltext;
}
}
// Generate the document.
this.c1PrintDocument1.Body.Children.Add(table);
this.c1PrintDocument1.Generate();
}
2. Add the following code to your project to make the table's width and height fifteen centimeters long:
table.Height = New C1.C1Preview.Unit(15, C1.C1Preview.UnitTypeEnum.Cm)
table.Width = New C1.C1Preview.Unit(15, C1.C1Preview.UnitTypeEnum.Cm)
• C#
table.Height = new C1.C1Preview.Unit(15, C1.C1Preview.UnitTypeEnum.Cm);
table.Width = new C1.C1Preview.Unit(15, C1.C1Preview.UnitTypeEnum.Cm);
3. Add the following code to your project to assign a new instance of the LineDef class to the borders of the third row as follows (note that the constructor we use specifies that the new border will be red and 2 points wide):
table.Rows(2).Style.Borders.All = New C1.C1Preview.LineDef("2pt", Color.Red)
• C#
table.Rows[2].Style.Borders.All = new C1.C1Preview.LineDef("2pt", Color.Red);
4. Assign a new instance of the LineDef class to the borders of the first column as follows (note that the constructor we use specifies that the new border will be blue and 6 points wide):
table.Cols(0).Style.Borders.All = New C1.C1Preview.LineDef("6pt", Color.Blue)
• C#
table.Cols[0].Style.Borders.All = new C1.C1Preview.LineDef("6pt", Color.Blue);
Run the program and observe the following:
Your borders will appear similar to the table below at run time:

|
