The Fields group of the Design tab in the C1ReportDesigner application provides tools for creating report fields. This toolbar is enabled only in design mode. The Fields group on the Design tab appears similar to the following:
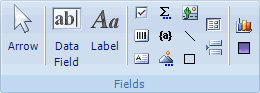
Each field button creates a field and initializes its properties. The Fields group consists of the following options:
Arrow: Returns the mouse cursor to an arrow cursor.
Data Field: Creates a field that is bound to the source recordset. When you click this button, a menu appears and you can select the recordset field. Bound fields are not limited to displaying raw data from the database. You can edit their Text property and use any VBScript expression.
Label: Creates a field that displays static text.
Add CheckBox (![]() ): Creates a bound field that displays a Boolean value as a check box.
By default, the check box displays a regular check mark. You can change it into
a radio button or cross mark by changing the value of the field's Checkbox
property after it has been created.
): Creates a bound field that displays a Boolean value as a check box.
By default, the check box displays a regular check mark. You can change it into
a radio button or cross mark by changing the value of the field's Checkbox
property after it has been created.
Add BarCode (![]() ): Creates a field that displays a barcode. When you click this
button, a menu appears where you can select other fields that are contained in
the same report definition file to be displayed as a barcode.
): Creates a field that displays a barcode. When you click this
button, a menu appears where you can select other fields that are contained in
the same report definition file to be displayed as a barcode.
Add Rtf Field (![]() ): Creates an RTF field. When you click this button, a menu appears
where you can select other fields that are contained in the same report
definition file to be displayed in RTF format.
): Creates an RTF field. When you click this button, a menu appears
where you can select other fields that are contained in the same report
definition file to be displayed in RTF format.
Add Calculated Field (![]() ): Creates a calculated field. When you click this button, the code
editor dialog box appears so you can enter the VBScript expression whose value
you want to display.
): Creates a calculated field. When you click this button, the code
editor dialog box appears so you can enter the VBScript expression whose value
you want to display.
Add Common Calculated Field (![]() ): Creates a field with a commonly used expression. When you
click this button, a menu appears and you can select expressions that render the
date or time when the report was created or printed, the page number, page
count, or "page n of m", or the report name.
): Creates a field with a commonly used expression. When you
click this button, a menu appears and you can select expressions that render the
date or time when the report was created or printed, the page number, page
count, or "page n of m", or the report name.
Add Unbound Picture (![]() ): Creates a field that displays a static picture, such as a logo.
When you click this button, a dialog box appears to prompt you for a picture
file to insert in the report. A copy is made of the picture you select and
placed in the same directory as the report file. You must distribute this file
with the application unless you embed the report file in the application. When
you embed a report file in your application, any unbound picture files are
embedded too.
): Creates a field that displays a static picture, such as a logo.
When you click this button, a dialog box appears to prompt you for a picture
file to insert in the report. A copy is made of the picture you select and
placed in the same directory as the report file. You must distribute this file
with the application unless you embed the report file in the application. When
you embed a report file in your application, any unbound picture files are
embedded too.
Add Bound Picture (![]() ): Creates a field that displays a picture (or object) stored in the
recordset. When you click this button, a menu appears so you can select a
picture field in the source recordset (if there is one; not all recordsets
contain this type of field).
): Creates a field that displays a picture (or object) stored in the
recordset. When you click this button, a menu appears so you can select a
picture field in the source recordset (if there is one; not all recordsets
contain this type of field).
Add Line (![]() ): Creates a line. Lines are often used as separators.
): Creates a line. Lines are often used as separators.
Add Rectangle (![]() ): Creates a rectangle. Rectangles are often used to highlight groups
of fields or to create tables and grids.
): Creates a rectangle. Rectangles are often used to highlight groups
of fields or to create tables and grids.
Add SubReport (![]() ): Creates a field that displays another report. When you click this
button, a menu appears and you can select other reports that are contained in
the same report definition file. See Creating a Master-Detail
Report Using Subreports for more information.
): Creates a field that displays another report. When you click this
button, a menu appears and you can select other reports that are contained in
the same report definition file. See Creating a Master-Detail
Report Using Subreports for more information.
Add Page Break (![]() ): Creates a field that inserts a page break.
): Creates a field that inserts a page break.
Add Chart Field (![]() ):Creates a field that displays a chart. Unlike most bound fields,
Chart fields display multiple values. To select the data you want to display,
set the Chart field's Chart.DataX and Chart.DataY properties. To
format the values along the X and Y axis, set the Chart.FormatX and
Chart.FormatY properties. See Adding
Chart Fields for more information.
):Creates a field that displays a chart. Unlike most bound fields,
Chart fields display multiple values. To select the data you want to display,
set the Chart field's Chart.DataX and Chart.DataY properties. To
format the values along the X and Y axis, set the Chart.FormatX and
Chart.FormatY properties. See Adding
Chart Fields for more information.
Add Gradient Field (![]() ): Creates a gradient field. Gradients are often used as a background
feature to make other fields stand out. See Adding Gradient Fields for more
information.
): Creates a gradient field. Gradients are often used as a background
feature to make other fields stand out. See Adding Gradient Fields for more
information.
See Enhancing the Report with Fields for more information. For more information on adding fields to your report, see Creating Report Fields.
|
