C1ToolBar includes a rich and flexible client-side object model that allows you to set the control's properties without postback. In this topic, you'll use this feature to create a client-side script that allows users to add any toolbar item such as C1ToolBarButton, C1ToolBarDropDownList, etc to the control at run-time.
To enable users to add toolbar items to the C1ToolBar control at run-time, complete the following steps:
1. Add a ScriptManager and a C1ToolBar control to your Web page or application.
2. Click the Source tab to enter Source view.
3. Add three Button controls and a checkbox control to the project by placing the following markup beneath the </cc1:C1ToolBar> tag:
<span style="color:Red;">
<br />
<br />
Add ToolBar Items</span>
<hr />
<input type="button" value="Add CheckButton" onclick="AddCheckButton()" /> <input type="button" value="Add DropDownList" onclick="AddDropDown()" /> <input type="button" value="Add SplitButton" onclick="AddSplitButton()" />
Checked State <input id="CheckedState" type="checkbox" />
Observe that the onclick event for each button control calls a function that will respond to when you click the Add CheckButton, Add DropDownList, or AddSplitButton buttons. The onclick event for the checkbox control calls the CheckState function when it’s checked. We will write these functions in the next step.
4. Add the following JavaScript code right above the <BODY> tag:
<script language="javascript" type="text/javascript">
function AddCheckButton() {
var controlObj = Sys.Application.findComponent("<%=C1ToolBar1.ClientID%>");
var checkState = document.getElementById("CheckedState");
var checkButton = new C1.Web.UI.Controls.C1ToolBar.C1ToolBarCheckButton();
checkButton.set_text("CheckButton");
if (checkState.checked) {
checkButton.set_checkState(1);
}
else {
checkButton.set_checkState(0);
}
controlObj.get_items().add(checkButton);
}
function AddDropDown() {
var controlObj = Sys.Application.findComponent("<%=C1ToolBar1.ClientID%>");
var dropdown = new C1.Web.UI.Controls.C1ToolBar.C1ToolBarDropDownList();
dropdown.set_text("DropDownList");
controlObj.get_items().add(dropdown);
}
function AddSplitButton() {
var controlObj = Sys.Application.findComponent("<%=C1ToolBar1.ClientID%>");
var splitBtn = new C1.Web.UI.Controls.C1ToolBar.C1ToolBarSplitButton();
splitBtn.set_text("SplitButton");
controlObj.get_items().add(splitBtn);
}
</script>
5. Press F5 to build the project.
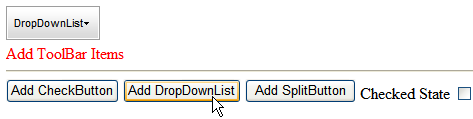
![]() This Topic Illustrates the Following:
This Topic Illustrates the Following:
Once your project is built, click any of the buttons and observe that the toolbar items have been added to the C1ToolBar control at run-time.
|