C1ToolBar includes a rich and flexible client-side object model that allows you to set the control's properties without postback. In this topic, you'll use this feature to create a client-side script that allows users to add toolbar items to a specific target in the C1ToolBar control at run-time.
To enable users to add different toolbar items to specific locations on the C1ToolBar control at run-time, complete the following steps:
1. Add a ScriptManager and a C1ToolBar control to your Web page or application.
2. Click the Source tab to enter Source view.
3. Replace the markup for the C1ToolBar control <cc1:C1ToolBar> </cc1:C1ToolBar> with the following:
<cc1:C1ToolBar ID="C1ToolBar1" runat="server" AccessKey="" Dock="None"
VisualStylePath="~/C1WebControls/VisualStyles">
<Items>
<cc1:C1ToolBarDropDownList runat="server" AccessKey="" Index="0" Name=""
Text="Add DropDown" Visible="True">
<Items>
<cc1:C1ToolBarButton runat="server" AccessKey="" Index="1" Name=""
Text="ToolBarButton1" Visible="True">
</cc1:C1ToolBarButton>
<cc1:C1ToolBarButton runat="server" AccessKey="" Index="1" Name=""
Text="ToolBarButton2" Visible="True">
</cc1:C1ToolBarButton>
</Items>
</cc1:C1ToolBarDropDownList>
<cc1:C1ToolBarSeparator runat="server" AccessKey="" Index="1" Name=""
Text="ToolBarSeparator1" Visible="True">
</cc1:C1ToolBarSeparator>
<cc1:C1ToolBarButton runat="server" AccessKey="" Index="2" Name=""
Text="ToolBarButton1" Visible="True">
</cc1:C1ToolBarButton>
<cc1:C1ToolBarButton runat="server" AccessKey="" Index="3" Name=""
Text="ToolBarButton2" Visible="True">
</cc1:C1ToolBarButton>
<cc1:C1ToolBarSeparator runat="server" AccessKey="" Index="4" Name=""
Text="ToolBarSeparator2" Visible="True">
</cc1:C1ToolBarSeparator>
<cc1:C1ToolBarSplitButton runat="server" AccessKey=""
EnabledDefaultButton="False" Index="4" Name="" NestedItemIndex="0"
Text="ToolBarSplitButton1" Visible="True">
<Items>
<cc1:C1ToolBarButton runat="server" AccessKey="" Index="0" Name=""
Text="ToolBarButton3" Visible="True">
</cc1:C1ToolBarButton>
<cc1:C1ToolBarButton runat="server" AccessKey="" Index="1" Name=""
Text="ToolBarButton4" Visible="True">
</cc1:C1ToolBarButton>
</Items>
</cc1:C1ToolBarSplitButton>
</Items>
</cc1:C1ToolBar>
4. Add one Select HTML control and a Button HTML control to the project by placing the following markup beneath the </cc1:C1ToolBar> tag:
<span style="color:Red;">
<br />
<br />
<br />
New Button</span>
<hr />
Target
<select id="selAddTarget">
<option>ToolBar</option>
<option>Last DropDownList</option>
<option>Last SplitButton</option>
</select>
<input type="button" value="Add" onclick="AddNewButton();"/>
</form>
Observe that the onclick event of the button control calls a function named "AddNewButton()". You will write this function in the next step.
5. Add the following JavaScript code above the <BODY> tag:
<script language="javascript" type="text/javascript">
function AddNewButton() {
var controlObj = Sys.Application.findComponent("<%=C1ToolBar1.ClientID%>");
var addTarget = document.getElementById("selAddTarget");
var addTargetStr = addTarget.options[addTarget.selectedIndex].text;
if (addTargetStr == "Last DropDownList") {
controlObj = FindLastItemOfType(C1.Web.UI.Controls.C1ToolBar.C1ToolBarDropDownList);
}
else if (addTargetStr == "Last SplitButton") {
controlObj = FindLastItemOfType(C1.Web.UI.Controls.C1ToolBar.C1ToolBarSplitButton);
}
var item = new C1.Web.UI.Controls.C1ToolBar.C1ToolBarButton();
item.set_text("Added client-side");
controlObj.get_items().add(item);
}
function FindLastItemOfType(itemType) {
var toolBar = $find("<%=C1ToolBar1.ClientID%>");
var toolBarItems = toolBar.get_items();
for (var i = toolBarItems.get_count() - 1; i >= 0; i--) {
var toolBarItem = toolBarItems.get_item(i);
if (itemType.isInstanceOfType(toolBarItem)) {
return toolBarItem;
}
}
return null;
}
</script>
6. Press F5 to build the project.
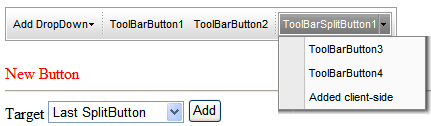
7. Select “Last Split Button” from the Target dropdown listbox and click the Add button.
![]() This Topic Illustrates the Following:
This Topic Illustrates the Following:
The new toolbar button appears in the last ToolBarDropDownList, ToolBarSplitButton, or C1ToolBar object when you specify the location and click the Add button.
|