This lesson shows you how to create an XML file through Visual Studio 2005 installed templates, add the XML Data Source component to the Web site, assign it to the C1TreeView control, and then set the binding for the C1TreeView.
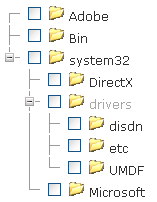
The final application will appear similar to the following at run time:
To create an XML file, add the XMLDataSource component to the Web site, and then assign it to the C1TreeView control.
1. Start a new Web site project.
2. Create a new Img folder in your project and copy the images from the Control Explorer Sample project located in ControlExplorer\C1TreeView\Img to your new Img folder.
Note: You may need to save and close your project and reopen it again for new img folder with the graphics to appear.
3. Right-click on the App_Data in the Solution Explorer and select Add New Item. The Add New Item dialog box appears.
4. Select the XML File and rename it "treeview_structure.xml". The XML file will open.
5. In the XML view, add the following data to the treeview_structure.xml replacing C1TreeView in each ImgUrlNode with the name of your project:
<?xml version="1.0" encoding="utf-8" ?>
<root>
<treeviewnode Text="Adobe" ImgUrlNode ="../C1TreeView/Img/OpenedFolder.gif" Value="1"></treeviewnode>
<treeviewnode Text="Bin" ImgUrlNode ="../C1TreeView/Img/OpenedFolder.gif" Value="2"></treeviewnode>
<treeviewnode Text="system32" Expanded="true" ImgUrlNodeCollapsed ="../C1TreeView/Img/Folder.gif" ImgUrlNodeExpanded ="../C1TreeView/Img/OpenedFolder.gif" Value="3">
<treeviewnode Text="DirectX" ImgUrlNode ="../C1TreeView/img/OpenedFolder.gif" Value="1"></treeviewnode>
<treeviewnode Text="drivers" Expanded="true" ImgUrlNodeCollapsed="../C1TreeView/Img/Folder.gif" ImgUrlNodeExpanded ="../C1TreeView/Img/OpenedFolder.gif" Value="2">
<treeviewnode Text="disdn" ImgUrlNode ="../C1TreeView/Img/OpenedFolder.gif" Value="1"></treeviewnode>
<treeviewnode Text="etc" ImgUrlNode ="../C1TreeView/Img/OpenedFolder.gif" Value="2"></treeviewnode>
<treeviewnode Text="UMDF" ImgUrlNode ="../C1TreeView/Img/OpenedFolder.gif" Value="2"></treeviewnode>
</treeviewnode>
<treeviewnode Text="Microsoft" ImgUrlNode ="../C1TreeView/Img/OpenedFolder.gif" Value="3"></treeviewnode>
</treeviewnode>
</root>
Note: Notice how the <treeviewnode> tags are indented for the child items.
6. Switch back to the .aspx page and select the Design tab to switch to Design view.
7. Expand the Data node in the Visual Studio Toolbox and add the XmlDataSource component to the Web page using a drag-and-drop operation.
8. Right-click on the XmlDataSource control and select Properties to view its properties in the Properties window.
9. In the Properties window, click on the ellipsis button next to the DataFile property to open the Select XML File dialog box. In the right pane, select the treeview_structure.xml file. Click OK to add it to the XmlDataSource1.DataFile property.
10. In the Properties window, set the XmlDataSource1.Xpath property to "root/treeviewnode".
11. Double-click on the C1TreeView control from the Visual Studio Toolbox to add it to your page.
12. Open the C1TreeView control's C1TreeView Tasks menu and select XmlDataSource1 from the Choose Data Source drop-down listbox
13. Click on the Source tab to switch to your source page and add the following DataBinding tags within the C1TreeView tags.
<DataBindings>
<cc1:C1TreeViewNodeBinding DataMember="treeviewnode"
CollapsedImageUrlField="CollapsedImageUrl" ExpandedImageUrlField="ExpandedImageUrl" ImageUrlField="ImgUrlNode"
ExpandedField="Expanded" TextField="Text" ValueField="Value" />
</DataBindings>
Note: Two key properties are the DataMember and TextField properties. The DataMember sets the data member from the XML file to bind to the C1TreeView. The TextField gets the value of the Text property of a C1TreeViewNode object to which the C1TreeViewNodeBinding object is applied.
14. Toggle back to the Design view and select Edit Bindings from the C1TreeView Tasks menu. The Bindings Collection Editor appears.
15. Select treeviewnode in the pane to show the binding properties for the C1TreeViewNode.
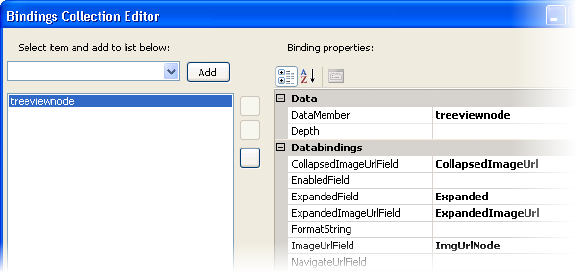
Notice the DataMember, treeviewnode, is added to the C1TreeViewNodeBindingCollection and the C1TreeViewNodeBinding properties appear in the property grid so you can easily modify the settings for the treeviewnode object.
16. Close the Bindings Collection Editor dialog box.
17. Select the C1TreeView control and in the Properties window set the ShowCheckBoxes property to True.
18. Save and build your project. Observe that the data from the treeview_structure.xml file is reflected in the C1TreeView control, and looks similar to the following at run time:
|