Content templates are useful for customizing your dialog window for your application and for displaying additional information in the content area in the dialog window. For more information on templates, see Content and Status Bar Templates.
In the following example, you will add content to the content template of a dialog window in the design view and in the source view. In addition, the dialog window will function as an update panel updating content without reloading the rest of the page.
To create a content template for C1Window, complete the following:
1. Navigate to the Visual Studio Toolbox, and double-click the Hyperlink and C1Window icons to add the controls to your Form.
2. Select Hyperlink1 and in the Properties window set its Text property to "Show Window".
3. Click inside the content area of C1Window1 and press the ENTER key, then type the following text: " The current server time is:".
4. Switch to source view, notice that the text you just entered is located within the <ContentTemplate> tags, like the following:
<ContentTemplate></br>
<span ...>
The current server time is:
</span>
</ContentTemplate>
Any content you enter in the content area of the dialog window at design time will appear within the content template tags.
5. In between the Content Template opening and closing tags you can add arbitrary controls and text. Add the following to the <ContentTemplate> tag to add text box and button controls to the dialog window:
<ContentTemplate><br />
<span ...>
The current server time is:
</span><br />
<asp:TextBox ID="TextBox1" runat="server"></asp:TextBox><br />
<br />
<asp:Button ID="Button1" runat="server" Text="Update Time" />
</ContentTemplate>
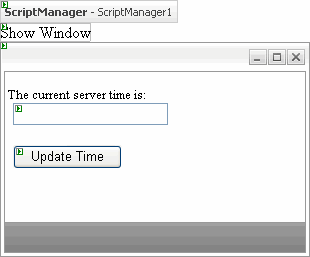
6. Switch to Design view and notice the text box and button controls were added inside the content area:

7. Resize the C1Window to fit the controls by dragging the lower right-hand corner of the control.
8. Double-click the Web page to switch to code view and create an event handler for the Load event. Enter the following code in the Page_Load event to initialize the control:
Protected Sub Page_Load(ByVal sender As Object, ByVal e As System.EventArgs) Handles Me.Load
Dim tb As TextBox = C1Window1.FindControl("TextBox1")
tb.Text = DateTime.Now.ToString()
HyperLink1.NavigateUrl = "javascript:openWindow($get(""" & C1Window1.ClientID & """))"
End Sub
• C#
protected void Page_Load(object sender, EventArgs e)
{
TextBox tb = (TextBox)C1Window1.FindControl("TextBox1");
tb.Text = DateTime.Now.ToString();
HyperLink1.NavigateUrl = "javascript:openWindow($get(\"" + C1Window1.ClientID + "\"))";
}
9. Switch to the source view and add the following JavaScript just after the Hyperlink tag, so that clicking the hyperlink will open the dialog window:
<script type="text/javascript">
function openWindow(dialog)
{
form_dialog = dialog.control;
dialog.control.show();
}
</script>
This topic illustrates the following:
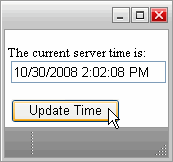
If you run the program and click Show Window; the dialog window will appear like the following:

Select the Update Time button. Notice that the time is refreshed – the dialog window acts as an update panel refreshing content without the page being reloaded.
|
