To customize the time column of a C1Scheduler control, you can edit the built-in C1Scheduler_TimeRuler_Template. In the following examples, we will edit the TimeRuler datatemplate to change the way the time appears in the time column and to change the background color of the time column.
Changing the layout of the time column
1. In the Visual Studio Solution Explorer, right-click the project name and select Add > Resource Dictionary.
2. Name your resource dictionary and click Add.
3. Add the C1Scheduler namespace so it looks like the following:
<ResourceDictionary xmlns="http://schemas.microsoft.com/winfx/2006/xaml/presentation"
xmlns:c1sched="clr-namespace:C1.WPF.C1Schedule;assembly=C1.WPF.C1Schedule"
xmlns:x="http://schemas.microsoft.com/winfx/2006/xaml">
4. Find and open Default.xml installed with ComponentOne Studio for WPF to C:\Program Files\ComponentOne\Studio for WPF\C1Schedule\XAML\themes\SchedulerThemes\Office2007.
5. Find the datatemplate with the C1Scheduler_TimeRuler_Template key. Click here to view the XAML.
<!-- determines the template used for one hour of a time ruler in a Day view -->
<DataTemplate x:Key="C1Scheduler_TimeRuler_Template">
<Grid Name="OneHourGrid">
<Grid.ColumnDefinitions>
<ColumnDefinition Width="Auto" />
<ColumnDefinition MinWidth="20" SharedSizeGroup="Minutes" />
</Grid.ColumnDefinitions>
<ItemsControl Grid.Column="1" x:Name="IntervalMarkersList" ItemsSource="{Binding Items}">
<ItemsControl.ItemTemplate>
<DataTemplate>
<Border BorderThickness="0,1px,0,0" Margin="0,0,4,0" SnapsToDevicePixels="True"
BorderBrush="{DynamicResource C1Scheduler_ControlAreaLines_Brush}" />
</DataTemplate>
</ItemsControl.ItemTemplate>
<ItemsControl.ItemsPanel>
<ItemsPanelTemplate>
<UniformGrid Rows="{Binding ElementName=IntervalMarkersList, Path=Items.Count}" />
</ItemsPanelTemplate>
</ItemsControl.ItemsPanel>
</ItemsControl>
<Border BorderThickness="0,1px,0,0" Margin="4,0,0,0" Grid.Column="0" SnapsToDevicePixels="True"
BorderBrush="{DynamicResource C1Scheduler_ControlAreaLines_Brush}"
HorizontalAlignment="Right" VerticalAlignment="Top" MinWidth="25">
<TextBlock
FontSize="16" Foreground="{DynamicResource C1Scheduler_ControlAreaText_Brush}"
HorizontalAlignment="Right" Padding="3,0,3,0" >
<TextBlock.Text>
<MultiBinding Converter="{x:Static c1sched:DateTimeInfoToStringConverter.Default}">
<Binding Path="StartTimeInfo"/>
<Binding Source="hh" />
</MultiBinding>
</TextBlock.Text>
</TextBlock>
</Border>
<TextBlock FontSize="11" Grid.Column="1"
Foreground="{DynamicResource C1Scheduler_ControlAreaText_Brush}"
HorizontalAlignment="Right" Padding="3,2,2,0" Margin="0,0,4,0">
<TextBlock.Text>
<Binding Converter="{x:Static c1sched:TimeRulerConverter.Default}"
Path="VisualIntervals[0].StartTimeInfo" />
</TextBlock.Text>
</TextBlock>
</Grid>
</DataTemplate>
6. Copy and paste the datatemplate into your resource dictionary.
7. Change the following XAML:
<TextBlock Text="{Binding VisualIntervals[0].StartTimeInfo.FormattedDate[hh]}"
So that it looks like this:
<TextBlock Text="{Binding VisualIntervals[0].StartTimeInfo.FormattedDate[%h]}"
8. In the Solution Explorer, double-click Window1.xaml or the main window/page of your project.
9. Add a resource to point to your resource dictionary:
<Window.Resources>
<ResourceDictionary>
<ResourceDictionary x:Key="{ComponentResourceKey TypeInTargetAssembly={x:Type my:C1Scheduler},
ResourceId=custom_theme}" Source="MyResourceDictionary.xaml" />
</ResourceDictionary>
</Window.Resources>
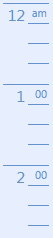
Here is an example of what the time column looked like before changing the datatemplate as well as what it looks like once the custom format string is changed:
|
hh Format String |
%h Format String |
|
|
|

Changing the color of the time column
1. In the Visual Studio Solution Explorer, right-click the project name and select Add > Resource Dictionary.
2. Name your resource dictionary and click Add.
3. Add the C1Scheduler namespace so it looks like the following:
<ResourceDictionary xmlns="http://schemas.microsoft.com/winfx/2006/xaml/presentation"
xmlns:c1sched="clr-namespace:C1.WPF.C1Schedule;assembly=C1.WPF.C1Schedule"
xmlns:x="http://schemas.microsoft.com/winfx/2006/xaml">
4. Find and open Default.xml installed with ComponentOne Studio for WPF to C:\Program Files\ComponentOne\Studio for WPF\C1Schedule\XAML\themes\SchedulerThemes\Office2007.
5. Find the datatemplate with the C1Scheduler_TimeRuler_Template key. Click here to view the XAML.
<!-- determines the template used for one hour of a time ruler in a Day view -->
<DataTemplate x:Key="C1Scheduler_TimeRuler_Template">
<Grid Name="OneHourGrid">
<Grid.ColumnDefinitions>
<ColumnDefinition Width="Auto" />
<ColumnDefinition MinWidth="20" SharedSizeGroup="Minutes" />
</Grid.ColumnDefinitions>
<ItemsControl Grid.Column="1" x:Name="IntervalMarkersList" ItemsSource="{Binding Items}">
<ItemsControl.ItemTemplate>
<DataTemplate>
<Border BorderThickness="0,1px,0,0" Margin="0,0,4,0" SnapsToDevicePixels="True"
BorderBrush="{DynamicResource C1Scheduler_ControlAreaLines_Brush}" />
</DataTemplate>
</ItemsControl.ItemTemplate>
<ItemsControl.ItemsPanel>
<ItemsPanelTemplate>
<UniformGrid Rows="{Binding ElementName=IntervalMarkersList, Path=Items.Count}" />
</ItemsPanelTemplate>
</ItemsControl.ItemsPanel>
</ItemsControl>
<Border BorderThickness="0,1px,0,0" Margin="4,0,0,0" Grid.Column="0" SnapsToDevicePixels="True"
BorderBrush="{DynamicResource C1Scheduler_ControlAreaLines_Brush}"
HorizontalAlignment="Right" VerticalAlignment="Top" MinWidth="25">
<TextBlock Text="{Binding VisualIntervals[0].StartTimeInfo.FormattedDate[hh]}"
FontSize="16"
Foreground="{DynamicResource C1Scheduler_ControlAreaText_Brush}"
HorizontalAlignment="Right" Padding="3,0,3,0" />
</Border>
<TextBlock FontSize="11" Grid.Column="1"
Foreground="{DynamicResource C1Scheduler_ControlAreaText_Brush}"
HorizontalAlignment="Right" Padding="3,2,2,0" Margin="0,0,4,0">
<TextBlock.Text>
<Binding Converter="{x:Static c1sched:TimeRulerConverter.Default}"
Mode="OneWay" Path="VisualIntervals[0].StartTimeInfo" />
</TextBlock.Text>
</TextBlock>
</Grid>
</DataTemplate>
6. Copy and paste the datatemplate into your resource dictionary.
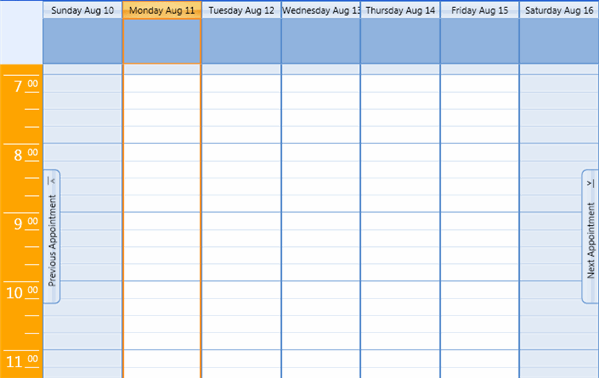
7. Edit the Grid Name to include a background color:
<Grid Name="OneHourGrid" Background="Orange">
8. In the Solution Explorer, double-click Window1.xaml or the main window/page of your project.
9. Add a resource to point to your resource dictionary:
<Window.Resources>
<ResourceDictionary>
<ResourceDictionary x:Key="{ComponentResourceKey TypeInTargetAssembly={x:Type my:C1Scheduler},
ResourceId=custom_theme}" Source="MyResourceDictionary.xaml" />
</ResourceDictionary>
</Window.Resources>
This XAML creates a schedule that looks like the following image:
|