On the Pruning tab, you can choose elements to be included in your optimized file. Pinned elements will be included and unpinned elements will not be included in the final optimized file.
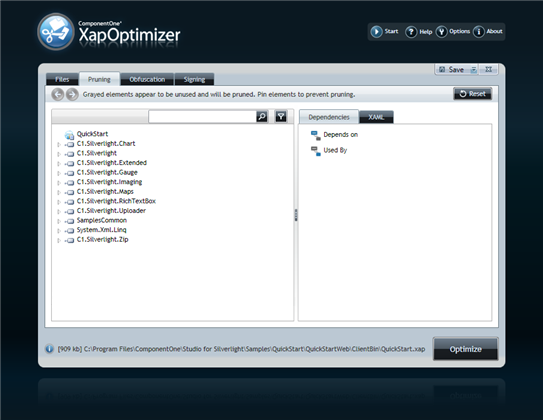
The Pruning tab appears similar to the following image:

The Pruning tab includes the following elements:
•History Navigation Arrows
Click the left and right history navigation arrows to view previously selected nodes and next historically visited nodes. Note that you can navigate through the list by using they keyboard arrow keys or by expanding nodes and selecting items with the mouse.
•Reset Button
The Reset button returns all of the items in the list to the default settings. If you have pinned or unpinned elements manually, you will lose your changed settings. If you want to restore the default pruning settings, click the Reset button on the top-right corner of the screen. This will unpin all elements so you can restart your customization.
•Search Bar
Type text in the search bar to locate items that match your term. You can enter one letter or a partial term to have all elements including that letter or term appear.
•Filter Button
Click the Filter button to filter the tree list by element. You can filter the tree to display only elements that are pinned (included in the optimized file), items that will be pruned, will not be pruned, and cannot be pruned (and must stay in the optimized file).
•Element Tree
The element tree allows you to view the elements that will be included in the optimized file and to pin or unpin elements to change the default settings. The element tree on the left shows all the assemblies and classes in the project. Grayed out classes are ones that don't seem to be used in the project and will be pruned by XapOptimizer. If you know that some classes will be invoked via reflection, click the pin icon next to the class name. This will pin the class, preventing it from being pruned. Any classes that depend on the pinned class will also be excluded from the pruning process.
•Dependencies Window
The Dependencies tab is selected and its window visible by default. This pane shows a dependency analysis for the currently selected class. This consists of two lists, one showing the classes that Depend on the selected class and one showing the classes that are Used by the selected class. You can browse through the dependencies in the application by double-clicking items under either branch. If you want to retrace your steps through the dependency tree, use the arrow buttons at the top left corner of the screen.
•XAML Window
The XAML window lets you see the actual XAML markup for the selected element. This will give you a better idea of how that element is used and whether it can be pruned or not.
•Splitter Bar
A splitter bar appears between the element tree and Dependencies/XAML windows. Drag the splitter bar to resize the windows if needed.
Once you are done selecting classes that should not be pruned, you can click the Save button on the top right of the screen to save your options. See Saving a XapOptimizer Project for more information.