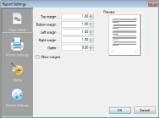
With ActiveReports Developer, you can modify facets of your report, such as the page setup, printer settings, styles, and global settings at design time, as well as at run time. To make changes at design time, access the Report Settings dialog through any of the following:
- With the report selected, go to the Visual Studio toolbar select Report menu > Settings.
- In the Report Explorer, right-click the Settings node and select Show or double-click the Settings node.
- Click the gray area outside the design surface to select the report and in the Commands section at the bottom of the Properties Window, click the Property dialog command.
The Report Settings dialog provides the following pages where you can set or modify various settings of your report.
On the Page Setup page, you can make changes to the report margins (left, right, top, and bottom), specify a gutter, and select the Mirror margins option. This page also shows a preview of how each setting appears on the report page.
- Top margin: Set the Top margin for report pages.
- Bottom margin: Set the Bottom margin for report pages.
- Left margin: Set the Left margin for report pages.
- Right margin: Set the Right margin for report pages.
- Gutter: Set Gutter to give extra space between the edge of the page and the margins. This allows reports to be bound.
- Mirror Margins: Select this option to set same inner and outside margins for opposite pages in the report.
By setting a gutter and selecting Mirror margins, you can easily set up reports for publishing.
On the Printer Settings page, you can make changes to the printer paper size and orientation.
- Paper Size: Select a paper size from the list of pre-defined paper sizes or choose Custom paper from the list to enable the Width and Height options for defining your own custom paper size.
- Width: Set the width of your custom paper size.
- Height: Set the height of your custom paper size.
- Orientation: Select one among Default, Portrait or Landscape as your paper orientation.
- Collate: Select whether to use collation or not.
- Duplex: Select whether the report should be printed in Simplex, Horizontal or Vertical duplex.
- Paper Source: Set the location of the paper source from the dropdown list.
 |
Important: For items set to Printer Default, default printer settings are used from the printer installed on the environment where the report is being created. The paper size might also change based on the runtime environment so in case the paper size of your report is fixed, please specify it beforehand. |
On the Styles page, you can change the appearance of text associated with controls, either by creating a new style sheet, or by modifying and applying an existing style.
- New: Use this button to create a new style.
- Delete: Use this button to delete an existing style.
- Export styles to file: Use this button to export an existing style to an external XML *.reportstyle file.
- Import styles from file: Use this button to import styles a *.reportstyle file.
- Font name: Set or modify the font in your new or existing style.
- Font size: Set or modify the font size in your new or existing style.
- Bold: Enable or disable Bold text for your new or existing style.
- Italic: Enable or disable Italic text in your new or existing style.
- Underline: Enable or disable Underlined text in your new or existing style.
- Strikethrough: Enable or disable Strikethrough text in your new or existing style.
- BackColor: Set the Backcolor to use in your new or existing style.
- ForeColor: Set the Forecolor to use in your new or existing style.
- Horizontal Alignment: Set the horizontal alignment to Left, Center, Right, Justify for your new or existing style.
- Vertical Alignment: Set the vertical alignment to Top, Middle, Bottom for your new or existing style.
- Script: Select the script to use in your new or existing style.
On the Global Settings page, you can change the design layout of your report.
- Snap Lines: Select whether to use snap lines at design time or not.
- Snap to Grid: Select whether the control moves from one snap line to another at design time.
- Show Grid: Select whether to show or hide the grid at design time.
- Grid Columns: Set the count of columns in a grid.
- Grid Rows: Set the count of rows in a grid.
- Dimension Lines: Set whether to use dimension lines at design time or not.
- Grid Mode: Select whether to show gridlines as Dots or Lines.
- Show Delete Prompt: Select this option to get a warning when you try to delete a parameter or calculated field from the Report Explorer.
- Ruler Units: Set the ruler units in Inches or Centimeters.
- Preview Pages: Set the number of pages to display in the Preview tab. Minimum values is 1 and maximum is 10000 pages. By default, the Preview tab displays 10 pages.


 Show All
 Hide All

