


In a page report, use the following steps to add report controls, groups and detail groups to the document map.
To add a control to the Document Map
- On the design surface, select a control you want to add to the Document map and right-click to choose Properties from the context menu.
- In the command section of the Properties Window, click Property dialog. This is a command to open the control's dialog. See Properties Window for more information on how to access commands.
- In the dialog that appears, go to the Navigation page and under the Document map label, enter a text or an expression representing the control in the Document map.


Alternatively,
- On the design surface, select the report control you want to add to the Document map and right-click to choose Properties from the context menu.
- In the Properties window that appears, enter a text or an expression in the Label property to represent the report control in the Document map.
Go to the preview tab or the Viewer to view the document map.
To add a group or a detail group to the Document Map
- Open a report that contains a group. See Grouping in a Data Region for further information.
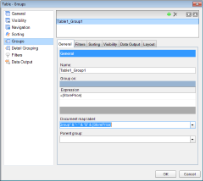
- On the design surface, select the data region on which grouping or detail grouping has been set and go to the command section which appears below the Properties Window.
- Click Property dialog to open the data region dialog. See Properties Window for more information on how to access commands.
- In the dialog that appears, go to the Grouping or Detail Grouping page, and under the Document map label, enter a text or an expression representing the group or detail group in the Document Map.
Go to the preview tab or the Viewer to view the document map.
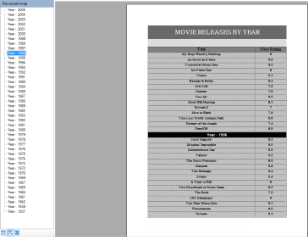
To create a hierarchical Document Map
- Open a report that contains a data region like a Table.
- With the data region selected, right-click to open the context menu and select Properties.
- In the Properties Window that appears, select the Property dialog command at the bottom of the window to open the data region dialog. See Properties Window for further information on how to access commands.
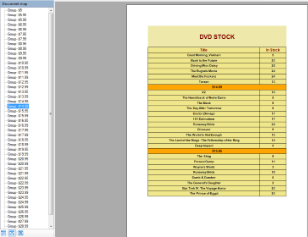
- On the data region dialog, on the Groups page, set the grouping expression. For example, group the data on StorePrice (=Fields!StorePrice.Value). See Grouping in a Data Region for further information.
- On the same Groups page, set the Document map label to the value of the grouping expression. For example, =Fields!StorePrice.Value.
- On the design surface, select a control inside the data region. For example, the TextBox in the detail row of the Table data region.
- Right-click the control and select properties to open the Properties Window. In the command section of the Properties Window, click Property dialog.
- In the dialog that appears, go to the Navigation page and under the Document map label, enter a text or an expression representing the control in the Document map.
Go to the preview tab or the Viewer to view the document map.

 |
Note: In an FPL report, you can also set grouping and set the document map label on the FixedPage dialog > Groups page. See Grouping in a FixedPage to learn how to set groups on a fixed page. |