


 Hide All
ActiveReports Developer supports newspaper column layouts in both the Detail and Group sections. You can render the columns either horizontally or vertically in the section with options to break the column on the Group section (i.e. start a new column on the change of a group).
There is also a Boolean ColumnGroupKeepTogether property on the GroupHeader. When set to True, the ColumnGroupKeepTogether property attempts to prevent a group from splitting across columns. If a group cannot fit in the current column, it tries the next. If the group is too large for a single column, the property is ignored.
 |
Note: The ColumnGroupKeepTogether property only works when the GroupHeader's GroupKeepTogether property is set to All. |
This walkthrough illustrates how to create a simple report using columns, and is split up into the following activities:
- Connecting the report to a data source
- Adding controls to the report to display data
- Viewing the report
|
Note: This walkthrough uses the Northwind database. By default, in ActiveReports, the Northwind.mdb file is located at [User Documents folder]\ComponentOne Samples\ActiveReports Developer 7\Data\NWIND.mdb. |
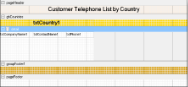
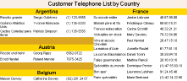
When you complete this walkthrough you get a layout that looks similar to the following at design time and at runtime.
Design Time Layout


Runtime Layout
 To add an ActiveReport to the Visual Studio project
- Create a new Visual Studio project.
- From the Project menu, select Add New Item.
- In the Add New Item dialog that appears, select ActiveReports 7 Section Report (code-based) and in the Name field, rename the file as rptColumnar.
- Click the Add button to open a new section report in the designer.
See Adding an ActiveReport to a Project for information on adding different report layouts.
To connect the report to a data source
- On the detail section band, click the Data Source Icon.
- In the Report Data Source dialog that appears, on the OLE DB tab, next to Connection String, click the Build button.
- In the Data Link Properties window that appears, select Microsoft Jet 4.0 OLE DB Provider and click the Next button to move to the Connection tab.
- Click the ellipsis (...) button to browse to your database, for example the NWind.mdb sample database. Click Open once you have selected the appropriate database path.
- Click the Test Connection button to see if you have successfully connected to the database.
- Click OK to close the Data Link Properties window and return to the Report Data Source dialog. Notice that the Connection String field gets filled automatically.
- In the Query field on the OLE DB tab, enter the following SQL query.
SQL Query  Copy Code
SELECT Country, CompanyName, ContactName, Phone FROM Customers ORDER BY Country - Click OK to save the data source and return to the report design surface.
To create a layout for the report
- Right-click the design surface of the report and select Insert, then Group Header/Footer to add a GroupHeader/Footer section.
- Select the group header and in the Properties Window, set the properties as follows.
Property Name Property Value Name ghCountry BackColor Gold DataField Country ColumnGroupKeepTogether True GroupKeepTogether All - Select the group footer and in the Properties window, set the BackColor property to Goldenrod.
- In the Report Explorer, drag the Country field onto the GroupHeader section and in the Properties window, set its properties as follows.
Property Name Property Value Location 0, 0 in Size 3.25, 0.2 in Alignment Center FontSize 12 Font Bold True - Select the PageHeader section and in the Properties window, set the BackColor property to Linen.
- From the toolbox, drag a Label control onto the PageHeader section and in the Properties window, set the properties as follows:
Property Name Property Value Location 0, 0 in Size 6.5, 0.25 in Alignment Center FontSize 14 Text Customer Telephone List by Country - Select the Detail section and in the Properties window, set the properties as follows.
Property Name Property Value CanShrink True ColumnCount 2 - In the Report Explorer, expand the Fields node, then the Bound node. Drag the following fields onto the Detail section and set the properties of each textbox as indicated.
Property Name Property Value Field CompanyName Location 0, 0 in Size 1.15, 0.2 in Font Size 8pt Property Name Property Value Field ContactName Location 1.15, 0 in Size 1.15, 0.2 in Font Size 8pt Property Name Property Value Field Phone Location 2.3, 0 in Size 0.95, 0.2 in Font Size 8pt
- Click the preview tab to view the report at design time.
OR
- Open the report in the Viewer. See Using the Viewer for further information.