


 Hide All
Using ActiveReports Developer Professional Edition, you can set up a custom end-user report designer. This walkthrough illustrates how to set up a basic end-user report designer on a Windows Forms application (The Designer control is not supported on a Web application).
This walkthrough is split into the following activities:
- Adding controls to the form
- Adding code to import the toolbox library
- Adding an OnExit method
- Adding code to create a data toolbox group
- Adding code to set up the toolbox, menus and toolstrips
- Viewing the End User Report Designer
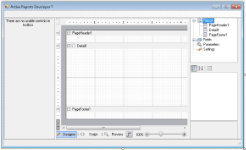
When you have finished this walkthrough, you will have a working end-user report designer that looks like the following.


 |
Note: If you need help with adding the Designer controls to your Visual Studio toolbox, see Adding ActiveReports Controls. |
- Select the Windows Form in your application and go to the Properties Window to change the Name property to formDesigner and Text to Active Reports Developer 7.
- Resize the Form so that you can comfortably add the controls.
- From the Visual Studio toolbox, drag the following controls onto the Form in the order listed below, setting the properties as indicated (If you have not yet added the ActiveReports controls to your toolbox, see the Adding ActiveReports Controls topic).
Control Parent Name Dock Property Value ToolStripContainer formDesigner ToolStripContainer1 Fill LeftToolStripPanel - Enabled = False
RightToolStripPanel - Enabled = FalseSplitContainer ToolStripContainer1 SplitContainer1 Fill FixedPanel = Panel1 Designer SplitContainer1.Panel2 arDesigner None Anchor = Top, Bottom, Left, Right
Resize and move as necessary.ReportExplorer SplitContainer1.Panel2 arReportExplorer None ReportDesigner = arDesigner
Anchor = Top, Right
Resize and move as necessary.PropertyGrid SplitContainer1.Panel2 arPropertyGrid None Anchor = Top, Bottom, Right
Resize and move as necessary.Toolbox SplitContainer1.Panel1 arToolbox Fill - - Select arDesigner and in the Properties window, drop down the PropertyGrid property and select arPropertyGrid.
- With the controls added in the correct order and all of the above properties set, the form looks similar to the following:
- Right-click the form and select View Code.
- In the code view that appears, add the following code to give your project access to the Toolbox library.
The following examples show what the code looks like.
 To write the code in Visual Basic.NET
| Visual Basic.NET code. Paste ABOVE the formDesigner class. |  Copy Code Copy Code |
|---|---|
'Add the following Imports statements Imports GrapeCity.ActiveReports Imports GrapeCity.ActiveReports.Design Imports GrapeCity.ActiveReports.Design.Toolbox Imports GrapeCity.ActiveReports.SectionReportModel Imports GrapeCity.ActiveReports.Data |
|
| C# code. Paste ABOVE the formDesigner class. | Copy Code |
|---|---|
//Add the following using statements using GrapeCity.ActiveReports; using GrapeCity.ActiveReports.Design; using GrapeCity.ActiveReports.Design.Toolbox; using GrapeCity.ActiveReports.SectionReportModel; using GrapeCity.ActiveReports.Data; |
|
- Right-click in any section of formDesigner, and select View Code.
- In the code view that appears, add the following code to create an OnExit method that you can call from the Exit menu item we create later.
The following examples show what the code looks like.
To write the code in Visual Basic.NET
| Visual Basic.NET code. Paste INSIDE the formDesigner class. | Copy Code |
|---|---|
Private Sub OnExit(ByVal sender As Object, ByVal e As EventArgs) MyBase.Close() End Sub |
|
| C# code. Paste INSIDE the formDesigner class. | Copy Code |
|---|---|
private void OnExit(object sender, EventArgs e)
{
    Close();
}
|
|
To create a data toolbox group
- Add the following code to create a data group on the toolbox.
- This code creates a LoadTools method that you can call in the formDesigner_Load event to load the new toolbox group into the toolbox.
The following examples show what the code looks like.
To write the code in Visual Basic.NET
| Visual Basic.NET code. Paste INSIDE the formDesigner class. | Copy Code |
|---|---|
Private Sub LoadTools(ByVal arToolbox As GrapeCity.ActiveReports.Design.Toolbox.Toolbox) 'Add Data Providers Me.arToolbox.AddToolboxItem(New System.Drawing.Design.ToolboxItem(GetType(System.Data.DataSet)), "Data") Me.arToolbox.AddToolboxItem(New System.Drawing.Design.ToolboxItem(GetType(System.Data.DataView)), "Data") Me.arToolbox.AddToolboxItem(New System.Drawing.Design.ToolboxItem(GetType(System.Data.OleDb.OleDbConnection)), "Data") Me.arToolbox.AddToolboxItem(New System.Drawing.Design.ToolboxItem(GetType(System.Data.OleDb.OleDbDataAdapter)), "Data") Me.arToolbox.AddToolboxItem(New System.Drawing.Design.ToolboxItem(GetType(System.Data.Odbc.OdbcConnection)), "Data") Me.arToolbox.AddToolboxItem(New System.Drawing.Design.ToolboxItem(GetType(System.Data.Odbc.OdbcDataAdapter)), "Data") Me.arToolbox.AddToolboxItem(New System.Drawing.Design.ToolboxItem(GetType(System.Data.SqlClient.SqlConnection)), "Data") Me.arToolbox.AddToolboxItem(New System.Drawing.Design.ToolboxItem(GetType(System.Data.SqlClient.SqlDataAdapter)), "Data") End Sub |
|
| C# code. Paste INSIDE the formDesigner class. | Copy Code |
|---|---|
private void LoadTools(GrapeCity.ActiveReports.Design.Toolbox.Toolbox arToolbox)
{
   //Add Data Providers
   this.arToolbox.AddToolboxItem(new System.Drawing.Design.ToolboxItem(typeof(System.Data.DataSet)), "Data");
   this.arToolbox.AddToolboxItem(new System.Drawing.Design.ToolboxItem(typeof(System.Data.DataView)), "Data");
   this.arToolbox.AddToolboxItem(new System.Drawing.Design.ToolboxItem(typeof(System.Data.OleDb.OleDbConnection)), "Data");
   this.arToolbox.AddToolboxItem(new System.Drawing.Design.ToolboxItem(typeof(System.Data.OleDb.OleDbDataAdapter)), "Data");
   this.arToolbox.AddToolboxItem(new System.Drawing.Design.ToolboxItem(typeof(System.Data.Odbc.OdbcConnection)), "Data");
   this.arToolbox.AddToolboxItem(new System.Drawing.Design.ToolboxItem(typeof(System.Data.Odbc.OdbcDataAdapter)), "Data");
   this.arToolbox.AddToolboxItem(new System.Drawing.Design.ToolboxItem(typeof(System.Data.SqlClient.SqlConnection)), "Data");
   this.arToolbox.AddToolboxItem(new System.Drawing.Design.ToolboxItem(typeof(System.Data.SqlClient.SqlDataAdapter)), "Data");
}
|
|
To set up the designer's toolbox, menus and toolstrips
- In the Design view of the form, double-click the title bar of formDesigner. This creates an event-handling method for the formDesigner Load event.
- Add code to the handler to:
- Set up the toolbox
- Set up the menu and tool strips
- Add an Exit command to the menu
The following examples show what the code for the method looks like.
To write the code in Visual Basic.NET
| Visual Basic.NET code. Paste INSIDE the formDesigner Load event. | Copy Code |
|---|---|
' Add controls to the toolbox
LoadTools(arToolbox)
arDesigner.Toolbox = arToolbox

' Add Menu and ToolStrips to Form
Dim menuStrip As ToolStrip = arDesigner.CreateToolStrips(DesignerToolStrips.Menu)(0)
Dim fileMenu As ToolStripDropDownItem = CType(menuStrip.Items(0), ToolStripDropDownItem)

' Add an Exit command to the File menu
fileMenu.DropDownItems.Add(New ToolStripMenuItem("Exit", Nothing, AddressOf OnExit))

Dim panel As ToolStripPanel = ToolStripContainer1.TopToolStripPanel
panel.Join(menuStrip, 0)
panel.Join(arDesigner.CreateToolStrips(DesignerToolStrips.Zoom)(0), 1)
panel.Join(arDesigner.CreateToolStrips(DesignerToolStrips.Undo)(0), 1)
panel.Join(arDesigner.CreateToolStrips(DesignerToolStrips.Edit)(0), 1)
panel.Join(arDesigner.CreateToolStrips(DesignerToolStrips.Report)(0), 1)

panel.Join(arDesigner.CreateToolStrips(DesignerToolStrips.Layout)(0), 2)
panel.Join(arDesigner.CreateToolStrips(DesignerToolStrips.Format)(0), 2)
|
|
| C# code. Paste INSIDE the formDesigner Load event. | Copy Code |
|---|---|
// Add controls to the toolbox
LoadTools(arToolbox);
arDesigner.Toolbox = arToolbox;

// Add Menu and CommandBar to Form
ToolStrip menuStrip = arDesigner.CreateToolStrips(DesignerToolStrips.Menu)[0];

ToolStripDropDownItem fileMenu = (ToolStripDropDownItem)menuStrip.Items[0];

// Add an Exit command to the File menu
fileMenu.DropDownItems.Add(new ToolStripMenuItem("Exit", null, this.OnExit));
ToolStripPanel panel = ToolStripContainer1.TopToolStripPanel;
panel.Join(menuStrip, 0);
panel.Join(arDesigner.CreateToolStrips(DesignerToolStrips.Zoom)[0], 1);
panel.Join(arDesigner.CreateToolStrips(DesignerToolStrips.Undo)[0], 1);
panel.Join(arDesigner.CreateToolStrips(DesignerToolStrips.Edit)[0], 1);
panel.Join(arDesigner.CreateToolStrips(DesignerToolStrips.Report)[0], 1);

panel.Join(arDesigner.CreateToolStrips(DesignerToolStrips.Layout)[0], 2);
panel.Join(arDesigner.CreateToolStrips(DesignerToolStrips.Format)[0], 2);
|
|
To view an End User Report Designer
- Press F5 to run the project. The End User Report Designer opens with a section layout.
- Go to the File menu and select New to open the Create New Report dialog.
- From Templates, select Page Report to open a page layout in the designer along with its corresponding toolbox controls and report explorer items.
- Go to the File menu again. Notice that an Exit menu item has been added to the listed menu items.