You can easily change the month or year of a C1MonthCalendar or C1MultiMonthCalendar control using the DateTime property.
Using Microsoft Blend
To change the month or year of a C1MonthCalendar or C1MultiMonthCalendar in Blend:
1. Add a C1MonthCalendar or C1MultiMonthCalendar control to your window and select it.
2. In the Properties panel of Design view, expand the DateTime node.
3. Enter a date for the DateTime property or click the drop-down arrow next to it to view the calendar. If you click the drop-down arrow, you can use the navigation arrows at the top of the calendar to move through the months and years, or you can click the month or year and choose from a pop-up list.
Using Visual Studio
To change the month or year of a C1MonthCalendar or C1MultiMonthCalendar in Visual Studio:
1. Add a C1MonthCalendar or C1MultiMonthCalendar control to your window and select it.
2. In the Properties window, enter a date for the DateTime property or click the drop-down arrow next to it to view the calendar. If you click the drop-down arrow, you can use the navigation arrows at the top of the calendar to move through the months and years, or you can click the month or year and choose from a pop-up list.
Using XAML
The following XAML sets the DateTime property:
<c1sched:C1MonthCalendar Margin="39,22,0,0" Name="C1MonthCalendar1" HorizontalAlignment="Left" Width="182" Height="159" VerticalAlignment="Top" DateTime="2008-01-29" />
At Run Time
To change the month or year of a C1MonthCalendar or C1MultiMonthCalendar control at run time:
1. Click the month or year at the top of the calendar. A pop-up list appears.
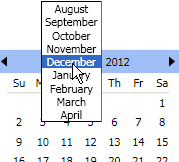
2. Select the desired month or year. If the month or year you are looking for does not appear in the list, select the last month or year and click the month or year again to see a new list.
|