Connecting Web Parts
Interactive connections can be made between Web Parts that are placed on the
same page.
Using the On-Board Designer, you can send data to or receive data
from other Web Parts and choose an event to trigger when the connection is
made.
Some examples:
- When a marker on a C1Maps Web Part is clicked, the store
locations in that city display in a C1DataGrid Web Part.
- When data is selected in a C1DataGrid Web Part, the information is
plotted in a C1Chart Web Part.
- When a location is selected in a C1DataGrid Web Part, that location
is displayed as a marker in a C1Maps Web Part.
The Quick Start includes an example of a Web Parts Connection. That
connection is between a C1Maps Web Part and a
C1DataGrid Web Part. To test drive this example yourself, try
the following examples:
To create a connection between two Web Parts
A rule of thumb about connecting Web Parts — the Web Part that will be
manipulated by the user is the "Send" Web Part, the one that displays
information based on that event is the "Receive" Web Part.
- Configure the two (or more) Web Parts that you would like to connect.
- Click the Connections tab.
- Since we want to send information to another Web Part, click the
Send tab on the far right.
- Click the drop-down on the left and choose an event, such
as Marker Clicked. (The events will vary based on the
Web Parts you have created.) For a list of available events, see Web Part Connection
Events.
- In the Connection Properties, choose the Send
To drop-down and choose the Web Part to send the data to.

- Click the Save Web Part button.
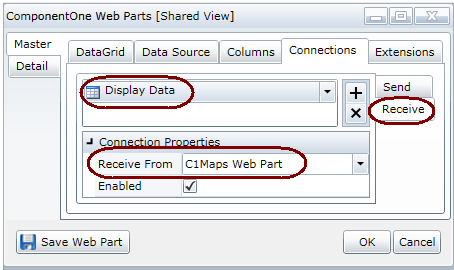
- Open the On-Board Designer for the Web Part that
should receive the information.
- Click the Connections tab.
-
Since we want to receive information from another Web
Part, choose the Receive tab on the far right.
- Click the drop-down on the left and choose an event, such
as Display Data.
- In the Connection Properties, choose the Receive
From drop-down and choose the Web Part to receive the data
from.

- Click the Save Web Part button.
- Test the connection.


