Connecting Web Parts Quick Start
Web Parts that are placed on the same page can be connected — these
connections will make the web parts interact with each other.
How it works:
- We will connect a C1Maps Web Part to an empty
C1DataGrid Web Part (we will use C1Maps
Quick Start we already created.)
- The existing C1Maps Web Part uses the Universities List and displays an
orange ball marker at the location of 30 Universities. When you click on any
orange marker, a photo of the University displays. Also, hovering over the
marker displays a tooltip with the name of the university.
- After the two Web Parts are connected, when you click on an orange
ball marker in the C1Maps Web Part:
- The University photo will display in the C1Maps Web
Part.
- The C1DataGrid Web Part will display the data about
that University. The data will be pulled from the Universities
data source used by the C1Maps Web Part.
To create a connection
- On the page that already contains the C1Maps Quick Start
Web Part, add a C1DataGrid Web Part. (See Adding a Web Part to a Page.)
- In the C1Maps Web Part, open the On-Board Designer. (See
Using the On-Board
Designer.)
- Click the Connections tab.
Since we want to send the information from the Map
to the DataGrid when a marker is clicked, choose the
Send tab on the far right.
- Click the drop-down on the left and choose Marker
Clicked.
- In the Connection Properties, choose to Send
To the C1DataGrid Web Part.

- Click the Save Web Part button.
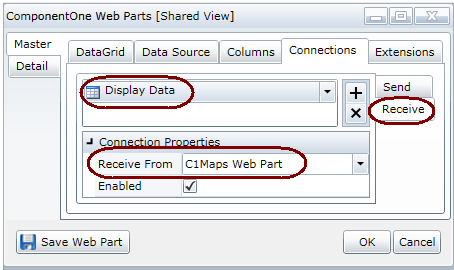
- In the C1DataGrid Web Part, open the On-Board
Designer.
- Click the Connections tab.
Since we want to receive information from the Map that
will be displayed in the DataGrid, choose the Receive tab on
the far right.
- Click the drop-down on the left and choose Display Data.
- In the Connection Properties, choose to Receive
From the C1Maps Web Part

- Click the Save Web Part button.
The result:
Now, when you click on an orange ball marker in the C1Maps Web Part, the
photo will display — and the C1DataGrid will display the
information about that University in the C1DataGrid. The
Data displayed in the DataGrid will be retrieved from the Universities data
source used by the C1Maps Web Part.
If you close the photo and choose another marker, the information about that
University will display in the DataGrid.


