Navigate to one of the following:
-
In Windows 7 or Vista: C:\Users\Public\Pictures\Sample Pictures
-
In XP: C:\Documents and Settings\All Users\Documents\My Pictures\Sample Pictures
For this Quick Start, you will first need to create a SharePoint Picture Library. We will use images that are already installed with Windows, but if you already have a Picture Library, or want to use your own images when creating a Picture Library, go for it.
Your picture library can include gif, png, and jpg files. You can also add tooltips to the images, see Using the C1CoverFlow Web Part.
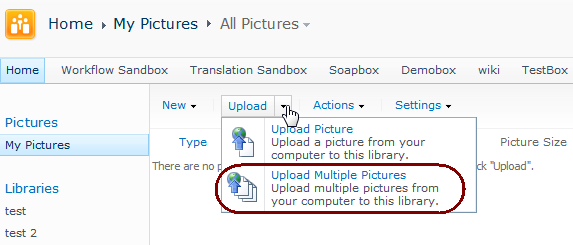
To create a SharePoint Picture Library
Navigate to one of the following:
In Windows 7 or Vista: C:\Users\Public\Pictures\Sample Pictures
In XP: C:\Documents and Settings\All Users\Documents\My Pictures\Sample Pictures
You can flip through the CoverFlow using the scroll bar on the bottom, or by using the arrow keys.
