A single document interface (SDI) application displays only one document at a time. SDI applications require the user to load another instance of the application to work with two or more documents. ActiveBar 3.0 allows you to create SDI applications with ease.
This Walkthrough is split up into the following activities.
- Adding an ActiveBar control to a form and opening the ActiveBar Designer
- Adding a Menu Bar
- Adding tools
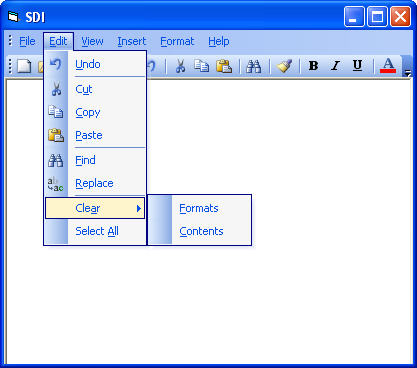
- Creating submenus
- Creating the SDI Toolbar
- Adding a RichTextBox control
- Adding functionality
When you have completed this walkthrough, you will have an SDI application that looks similar to the following.
 |
 |
Adding ActiveBar to your application
To Add ActiveBar to your application
- Open a new Visual Basic 6.0 project.
- Add the ActiveBar 3.0 component to your new project and draw the ActiveBar control onto your form.
- With the ActiveBar control selected, in the properties grid change the AlignToForm property to True.
Creating a menu bar
To create a menu bar
- Right-click the ActiveBar control in your form and select Properties to display the ActiveBar designer.
- Right-click the Categories node in the Designer tree view and select Insert to add a category for the menu bar items. Press F2 to rename the new category Main Menu.
-
Right-click on the Main Menu category and add the following 6 Button
tools to the category.
Category ID Name Caption Type Description Main Menu 1 fileMenu File Button Displays File Popup menu. Main Menu 2 editMenu Edit Button Displays Edit Popup menu. Main Menu 3 viewMenu View Button Displays View Popup menu. Main Menu 4 insertMenu Insert Button Displays Insert Popup menu. Main Menu 5 formatMenu Format Button Displays Format Popup menu. Main Menu 6 helpMenu Help Button Displays the Help Popup menu. - Right-click the Bands node and select Menu Bar from the context menu. Select the new Menu Bar icon and press F2 to rename the band Main Menu. Click Apply.
- Using your mouse and the SHIFT or CTRL button, select all of the tools in the Main Menu category. Drag the tools onto the Main Menu band in the Bands node.
Adding Tools to your SDI Application
To Add Tools to your SDI Application
- Right-click the Categories node and select Insert in the context menu to create 8 categories, one for each menu in the Main Menu category plus two extras to use for Clear and Other categories. Rename each to match its corresponding menu.
-
Add the following tools to each corresponding category. Set
the Style property for each Button tool to ddSIconText.
Category ID Name Caption Type Description Shortcut File 101 newMIFile &New Button Creates a new document. CTRL+N 102 openMIFile &Open Button Opens a document. CTRL+O, CTRL+F12, ALT+CTRL+F12 103 saveMIFile &Save Button Saves the active document. CTRL+S, SHIFT+F12, ALT+SHIFT+F12 104 saveasMIFile Save &As Button Saves active document with a new name. F12 105 printMIFile &Print Button Prints the active document. CTRL+P, CTRL+SHIFT+F12 106 pagesetupMIFile Page Set&up... Button Modifies the page layout. 107 exitMIFile E&xit Button Exits application and prompts to save changes to the active document. Edit 201 undoMIEdit &Undo Button Reverses last action. CTRL+Z, ALT+BACKSPACE 202 cutMIEdit C&ut Button Cuts the current selection from the document and places it on the clipboard. CTRL+X, SHIFT+Delete 203 copyMIEdit &Copy Button Copies the current selection from the document and places it on the clipboard. CTRL+C, CTRL+Num 0 204 pasteMIEdit &Paste Button Pastes an item from clipboard into a document to the left of the cursor. CTRL+V, SHIFT+INSERT 205 findMIEdit &Find Button Displays the Find dialog. CTRL+F 206 replaceMIEdit &Replace Button Displays the Find and Replace dialog. CTRL+H 207 clearMIEdit Cle&ar Button Displays the Clear sub menu. DELETE 208 selectallMIEdit Select &All Button Selects all the items in the document. CTRL+A, CTRL+Num 5 View 301 mainmenuMIView Main Menu Button Shows or hides the Main Menu. 302 standardtoolbarMIView Standard Toolbar Button Shows or hides the Standard Toolbar. 303 optionsMIView Options... Button Set application standards. Insert 401 breakMIInsert Break... Button Inserts a page break into a document. 402 pagenumbersMIInsert Page N&umbers Button Inserts page numbers into a document. 403 datetimeMIInsert Date and &Time Button Displays the Date and Time dialog. 404 symbolMIInsert Symbol... Button Displays Symbol dialog. 405 pictureMIInsert Picture... Button Displays the Picture dialog for selecting a picture file. 406 hyperlinkMIInsert Hyperlink... Button Displays the Hyperlink dialog for adding a Hyperlink to a document. CTRL+K Format 501 fontMIFormat &Font Button Sets the font settings for the current selection. 502 bulletMIFormat B&ullet Button Inserts bullet on the same line as the . CTRL+SHIFT+F 503 tabsMIFormat &Tabs Button Sets the Tabs for a document. 504 formatpaintMIFormat Format &Painter Button Copies the format of the current selection to be imposed onto another selection. 505 boldMIFormat &Bold Button Toggles the Bold setting on or off. CTRL+B, CTRL+SHIFT+B 506 italicMIFormat &Italic Button Toggles the Italic setting on or off. CTRL+I, CTRL+SHIFT+I 507 underlineMIFormat &Underline Button Toggles the Underline setting on or off. CTRL+U, CTRL+SHIFT+U 508 fontcolorMIFormat Font &Color Button Sets the Font Color for the currently selected text. 509 highlightMIFormat &Highlight Button Sets and highlights the currently selected text. Help 601 whatsthisMIHelp What's This Button Displays What's This Help. SHIFT+F1 602 aboutMIHelp &About Button Displays current application version and copyright information. Clear 2091 formatMIClear Format... Button Clears the formats for the current document. Tool displayed in Clear submenu. 2092 contentsMIClear Contents Button Clears the contents of the current document. Tool displayed in Clear submenu. F1 Other 701 separatorMIOther Separator Separates menu items and icons into groups to create a more organized UI. - Review the Icon Editor topic to add icons to the tools in your project.
- Review the Setting Shortcut Keys topic to assign shortcut keys to tools.
- Use the ampersand "&" to mark the accelerator character in menus. Try to keep the accelerator character unique within each sub menu.
- Tools that display a dialog as their action are usually followed by an ellipsis, "..." .
- For each tool, add 99000 to the ID value and use the resulting number as the HelpContextID. For example, give a tool with an ID value of 101 a HelpContextID value of 99101 and so on.
- For each tool, make the TooltipText property the same as the caption property without the ampersand.
Creating submenus
To create submenus
-
Right-click the Bands node in the Designer tree view and
select Popup Menu. Add a total of six Popup Menus, and
change the Name and Caption properties as in the following table.
Type Name Caption Popup menu filePopup &File Popup menu editPopup &Edit Popup menu viewPopup &View Popup menu insertPopup &Insert Popup menu formatPopup F&ormat Popup menu helpPopup &Help - In the Categories node, select all the tools in the File category using the SHIFT or CTRL button and your mouse, drag the tools and drop them onto filePopup.
- Select each tool under filePopup in turn and change the SubBand property for each to filePopup.
- Repeat steps 2 and 3 for each category and corresponding popup menu.
- Under the Main Menu band, select fileMenu and change the SubBand property to filePopup.
- Select each menu under the Main Menu band in turn and change the SubBand property for each to the corresponding popup band.
- Right-click Bands and select Popup Menu. Rename it clearPopup and set the caption to Cle&ar.
- Expand the editPopup node and select clearMIEdit. Set the SubBand Property for clearMIEdit to clearPopup. This creates a submenu for the Clear menu item.
Creating the SDI toolbar
To create the SDI toolbar
- Right-click the Bands node in the Designer tree view and select Tool Bar.
- Select the new Tool Bar and rename it standardToolbar.
- Select the following tools from their categories and drag them onto standardToolbar. Set the Style property for each tool to ddSIcon.
-
Drag the Separator tool from the Other category onto
standardToolbar to organize the Toolbar icons.
Category ID Name Caption Type Description> File 101 newMIFile &New Button Creates a new document. 102 openMIFile &Open Button Opens a document. 103 saveMIFile &Save Button Saves the active document. 105 printMIFile &Print Button Prints the active document. 106 pagesetupMIFile Page Set&up Button Modifies the page layout. Edit 201 undoMIEdit &Undo Button Reverses last action. 202 cutMIEdit C&ut Button Cuts the current selection from the document and places it on the clipboard. 203 copyMIEdit &Copy Button Copies the current selection from the document and places it on the clipboard. 204 pasteMIEdit &Paste Button Pastes an item from clipboard into a document to the left of the cursor. 205 findMIEdit &Find Button Displays the Find and Replace dialogue. Format 504 formatpainterMIFormat Format &Painter Button Copies the format of the current selection to be imposed onto another selection. 505 boldMIFormat &Bold Button Toggles the Bold setting on or off. 506 italicMIFormat &Italic Button Toggles the Italic setting on or off. 507 underlineMIFormat &Underline Button Toggles the Underline setting on or off. 508 fontcolorMIFormat Font &Color Button Sets the Font Color for the currently selected text.
When you finish, your SDI Toolbar ought to look similar to this toolbar.

Adding a Rich Textbox control
To add a Rich Textbox control
- Right-click in the Visual Studio toolbox and select Components.
- Scroll to the Microsoft Rich Textbox Control 6.0, select the checkbox, and click OK.
-
Draw the Rich Textbox control onto the form below the toolbars
and rename it to rtf.
Note: You can have ActiveBar automatically resize child controls. Resizing can be proportional or set to the client area. ActiveBar automatically resizes the Rich Textbox control as users dock bands to different areas on the form.
- Set the ActiveBar AutoSizeChildren property to 2-ddASClientArea.
-
In the Form_Load event add the following code to set rtf as the
client area control.
ActiveBar31.ClientAreaControl = rtf
ActiveBar31.RecalcLayout
Adding functionality to your application
To add functionality to your application
- Open the ActiveBar Designer toolbar and click the Create select case statement and copy to clipboard button.
- In the Code view for the form, add an ActiveBar31_ToolClick event.
- Paste the select case statement into the event.
- Add code to the case statement to control the actions for each tool.
When you are finished your application will look similar to the following.
| See Also |
Adding ActiveBar to a Project | ActiveBar Icon Editor | Setting Shortcut Keys | Creating a Menu | Walkthrough: Multiple Document Interface
Copyright © 2006 Data Dynamics, Ltd. All Rights Reserved.